An email list is your golden ticket in affiliate marketing, turning one-time visitors into loyal followers and ramping up conversions in a way you never thought possible.
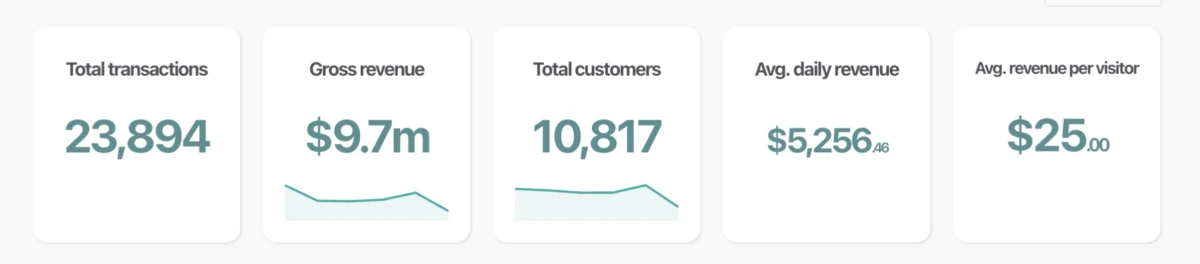
Take it from us – we’ve collected over 240,000 emails and leveraged them to earn almost $10 million in revenue.
But you have to do it right to reap the rewards.
In this post, you’ll learn everything you need to know to build a killer email list that converts like hell.

How to Build an Email List for Affiliate Marketing
Let’s go through the 9 steps needed to build a great email list.
- Pick your affiliate offer
- Create a lead magnet related to the offer
- Create opt-in forms
- Set up a Thank You page
- Create a squeeze page
- Choose an email service provider
- Build autoresponders
- Test broadcast emails
- Scale conversions and revenue
1 Pick Your Affiliate Offer
Starting with the right offer ensures alignment between your lead magnet and your products.
If there’s a mismatch, subscribers won’t be interested in the products you promote.
Use these tips to avoid the pitfalls of a bad offer:
- Recommend quality products that people want to buy. If you recommend crappy products, subscribers will associate your brand with them, and you’ll lose credibility.
- Choose something that appeals to a broad section of your audience. Products that appeal to a small corner of your audience don’t belong in your email strategy.
- Pick a high-paying offer. Email marketing isn’t easy; anything you promote should provide a worthwhile ROI.
- Ensure the offer has a well-optimized sales page. If their sales page sucks, you won’t get many conversions.
👉 See also: How To Find The Best Affiliate Programs For Your Niche
2 Create a Lead Magnet
A lead magnet is something of value you offer website visitors in exchange for their contact information – usually their email address.
Most people won’t share their email for no reason. A lead magnet incentivizes them to subscribe to your list and read your emails.
Let’s explore some of the most effective options.
Downloadable PDFs: The most common PDFs include checklists, cheat sheets, and templates.
A great example is this blog post templates lead magnet from Hubspot.

Videos: Tutorials and webinars can convert really well.
For example, our free authority site training is a top performer, averaging an opt-in rate of over 45%. (It’s also super helpful for affiliate marketers – check it out!)

Tools: Quizzes, scripts, Excel formulas, and other tools are great lead magnets, especially if they solve a thorny problem in your industry.
For example, this quiz from Expert Photography helps photographers identify their style.

Tips For Creating a Good Lead Magnet
To ensure a great opt-in rate, consider these elements when choosing and creating your lead magnet:
- Helpfulness: Your lead magnet should solve a problem for your audience.
- Immediate clarity of value: Your lead magnet should quickly demonstrate its value. The longer users wait to receive value, the less useful they’ll find it.
- Promised outcome: Communicate how subscribers can expect to benefit.
- Easily digestible: Keep it simple. Shorter content makes a stronger impact.
- Establishes authority: Use your lead magnet to establish credibility and prove why you’re the best source of this information.
- Be unique: Don’t rehash common knowledge. Create a one-of-a-kind tool or resource that doesn’t currently exist in your industry.
- Bridge to a sale: Your lead magnet should influence users to buy the products you promote.
3 Create Opt-in Forms
An opt-in form is an area of a website where users can enter their email to claim a lead magnet and sign up for an email list.
You can add them to your site in many locations, including pop ups, inside the content, at the top of your home page, and in the sidebar.
Types of Pop ups
Pop ups are the highest-performing way to deliver opt-in forms, and I recommend you use them to build your list.
Here are the best types of pop ups:
- Full-screen pop up: This covers the entire screen, forcing the user to actively accept or deny the offer.
- Classic pop up: This appears at the center of the page and blurs or darkens the content behind it.
- Floating bar: This form appears at the bottom of the page. It’s less intrusive but also less effective.
- Slide-in pop up: This “slides” into a small portion of the screen. It looks nice but isn’t great for conversions due to its small size.
If you want the highest conversion rate, use a full-screen pop up immediately on page load.
A study from GetSiteControl found that full screen pop ups receive the highest conversion rate at 3.41%. Classic pop ups followed at 2.95%, while floating bars (2.3%) and slide-ins (2.17%) brought up the rear.
Pop Up Examples
Here are a few examples of high-performing pop ups:
Cat Food Advisor’s classic pop up

Expert Photography’s full-screen pop up

Dog Food Advisor’s floating bar pop up

Tips for Creating Pop ups and Opt-in Forms
Use these proven tactics for creating high-converting pop ups and opt-in forms.
- Only ask for their name and email.
- Write catchy headlines.
- Be clear about what users are signing up for.
- Write compelling, concise copy about the lead magnet and its benefits.
- Assure users that their info won’t be sold.
- Set smart timing and display rules. Immediately loading the pop up will increase conversion rates but can affect other monetization methods.
- Create separate pop ups for mobile and desktop.
- We’ve found that single opt-in works better than double opt-in, but you should test this and see what works best for your site.
4 Set Up a Thank You Page
Once visitors sign up, it’s customary to direct them to a thank you page.
While this isn’t strictly necessary because you’ll send an email that says “thank you” and shares the lead magnet, thank you pages do let you showcase relevant affiliate products.
Consider The Points Guy’s thank you page, which features a wall of affiliate posts:

Or HubSpot’s single-product approach:
These perform best if the offers complement the lead magnet.
5 Create a Squeeze Page
Squeeze pages are landing pages designed to capture visitor contact info in exchange for a lead magnet. Their simplicity offers visitors a clear choice: sign up or leave.
Take this squeeze page from Fisher Investments as an example. It’s focused on the essentials: what it is, the benefits, and social proof.

Here are some elements that make for a great squeeze page:
- No distractions: Your squeeze page should be laser-focused on its goal of conversion. Eliminate menus, unrelated pop ups, and links to other content.
- Great headline: The headline should capture attention and pull readers in.
- Concise content: Briefly outline the lead magnet and its benefits.
- Quality visuals: Use images and videos that illustrate your lead magnet’s value.
- Trust indicators: Use testimonials and social proof to build trust with visitors.
- Clear CTA: Specify the action you want the reader to take.
- Easy signup form: A frictionless sign-up process increases conversions.
Again, don’t strive for perfection with your first version. Get something out there and optimize later.
6 Choose an Email Service Provider
Before you start sending emails, you’ll need a reliable email service provider.
Here are some essential features you should look for when comparing services:
- Email automation: This lets you send automated email sequences that trigger upon lead magnet signup.
- Fair pricing: As your list expands, costs will increase. Find an email marketing software with reasonable pricing.
- Integration: The tool should integrate seamlessly with other platforms like OptinMonster, WordPress, and Google Analytics.
- A/B testing: A critical feature that allows you to experiment with various subject lines, content, layouts, and send times.
- User-friendly design: A simple, intuitive interface saves time when creating and designing emails.
Most services are adequate for starting a new list, but one stands out in terms of beginner-friendliness.
Our Recommended Service for Beginners
For affiliate marketers new to email, I recommend Mailerlite.

It’s free until your list exceeds 1,000 email subscribers, and its user-friendliness makes it a great place to start.
7 Build Autoresponders
An autoresponder is an automated email sequence that sends messages to subscribers at pre-determined time intervals.

These are great for high-level affiliate marketing efforts. They keep subscribers engaged and let you promote affiliate products at just the right moments – all while being completely hands-off.
When you launch your email list, set up a basic autoresponder that promotes at least one product. This monetizes your list from day 1 and gives you a foundation for more complex sequences.
Here’s an overview of the process:
- Make a lead magnet related to your affiliate offer.
- Write an email series related to your lead magnet.
- Add the emails to your autoresponder sequence.
I recommend starting with a 4-email sequence: Welcome – Gain – Logic – Fear
- The Welcome email is the initial communication sent to new subscribers. This will typically deliver the lead magnet and introduce your brand.
- The Gain email highlights the unique benefits and transformative features of the affiliate product, illustrating how it can improve the subscriber’s life or solve a specific problem.
- The Logic email presents data, comparisons, or testimonials that underscore the effectiveness and value of the affiliate product, making a compelling case for its purchase.
- The Fear email emphasizes the potential missed opportunities or disadvantages of not seizing the current offer on the affiliate product. If possible, leverage limited-time deals or product scarcity to get a sale.
The Welcome email introduces you and your brand and helps the subscriber feel they’re receiving messages from an actual human, not a corporate email machine.
The remainder of the series is designed to target a wide array of buyers with varying psychological purchase triggers.
If someone is interested in buying the product, one of these emails should convince them.
Set up your autoresponder to send the Welcome email immediately after signup, and then subsequent emails with one-day delays.
8 Test Broadcast Emails
Broadcast emails are messages sent to your entire email list.
Once you have a large email list, you can use these to test if new autoresponder emails or product recommendations resonate with your audience.

If an email or product performs well, add it to the autoresponder sequence or use your findings to improve existing autoresponder emails.
Here are a few types of broadcast emails you can experiment with:
- Promotional emails that introduce new products or share new discounts
- Product-focused updates or announcements that keep your audience informed
- Flash sales that generate urgency and push people to buy
9 Scale Conversions and Revenue
Once you’ve built a sizeable email list, you can focus on scaling conversions and revenue.
Creating more content to drive traffic to the lead magnet is one way to scale. Strategies include streamlining your writing with AI writing tools or building a team of writers.
Another tactic is negotiating a higher commission rate with your top affiliate partners. Send an email stating that you’d like to devote more resources to their products, but the costs involved would necessitate a higher commission rate.
If you don’t want to scale your traffic, the best approach is to replace the affiliate offer with your own product. While this adds complexity to your business, your revenue will increase exponentially.
For more on how to scale your affiliate earnings, read our list of revenue-boosting affiliate marketing tips.
Should You Build an Email List?
If you’re an affiliate marketer, you should build an email list.
While it may be difficult initially, it provides many benefits you can’t get anywhere else:
- Direct communication with your target audience, fostering stronger and more personal relationships.
- Complete control over how your audience interacts with your brand.
- Captures information from potential buyers who might not be ready to purchase yet, letting you nurture these leads until they’re ready to convert.
- Diversifies your traffic sources, providing resilience against significant shifts in any single traffic channel.
- Offers stability in the face of major algorithm updates from Google or other platforms.
- Provides a foundation from which to launch your own products.
As if that weren’t enough, affiliate marketers who build an email list earn 66.4% more than those who don’t. If you’re not growing a list, you’re leaving money on the table.
Expert Email Marketing Tips For Affiliate Marketers
Here are a few extra tips to help you maximize your email campaigns.
- Don’t segment your list. Segmenting rarely boosts profits and adds unnecessary complexity to your marketing funnels.
- Mix value and offer emails. This strikes a healthy balance between building trust with your audience and promoting products for revenue.
- Check if your partners allow affiliate email marketing promotions. Some programs don’t allow this, so check the terms of service before building email marketing campaigns around their products.
- Ask your audience what they want to hear from you. Not sure what to send your audience? Send an email and ask them to reply with what they want to hear from you.
- Beware of tracking open and click rates. Many browsers and devices block tracking capabilities, so don’t put too much stock into these metrics.
For more tips, check out our podcast on how to build an email list using opt-in pop ups.
Summing Up
Building an email list for your affiliate marketing website is an absolute game-changer.
Every step in this process is crucial, from choosing the right affiliate offer, creating an irresistible lead magnet, setting up signup forms, integrating with the right email provider, and building autoresponders.
But don’t let that overwhelm you. The most important thing is to get started!
Identify the first thing you need to do to start building your list and take that action now.
When you look back in a few years – sitting on the piles of money your list has generated – you’ll be happy you did.
If you’re serious about succeeding with affiliate marketing, the best first step is to sign up for our free authority site training course.
In the past 10 years, we’ve taught 14,000 people how to grow their affiliate websites, and this free training teaches the most effective tactics we’ve learned.
Specifically, you’ll learn 7 secrets to make new sites 83% more successful.
FAQ
Do You Need an Email List for Affiliate Marketing?
You don’t need an email list for affiliate marketing, but it can help.
An email list helps you engage directly with your audience, builds trust, and nurtures leads toward purchases. It also adds stability to your efforts by creating a communication channel to your audience that algorithm updates can’t disrupt.
Though building one may seem challenging, the long-term advantages in relationships, control, and revenue growth are worth the effort.
Can You Do Affiliate Marketing by Email?
You can do affiliate marketing by email.
In fact, using email marketing to promote affiliate products is one of the best ways to earn affiliate conversions. Just check with your affiliate partner and email marketing provider and ensure they’re okay with using affiliate links in your emails.