Starting a travel blog is an exciting way to share your travel experiences.
Not only do you get to explore the world, but you also have the opportunity to build a community of fellow travel enthusiasts — and make a substantial income while you’re at it.
At Authority Hacker, we’ve guided over 15,000 students in creating profitable blogs, many of whom are in the travel niche.
We’ve also unlocked the secrets of turning blog visitors into cash – check out this sampling of affiliate commissions we’ve earned over the years.


To help you find similar success, we’ve distilled our expertise into this 10-step guide.
Why Start a Travel Blog
Whether you’re a seasoned traveler or just setting out on your first adventure, creating a travel blog can be a fulfilling path.
For starters, the travel industry is booming right now, and starting a travel blog lets you capitalize on that popularity. More than 90% of Americans plan to travel in 2024, and the global travel industry was estimated to rake in a whopping 7 trillion dollars.
Travel blogging also empowers you to make a positive impact on aspiring travelers. By sharing your experiences and insights, you can help people achieve their travel goals.
But the best part of starting a travel blog is getting paid to travel. With just a laptop and internet access, you could grow your travel site anywhere. And with affiliate marketers in the travel niche earning an average of $13,847 per month, there’s ample opportunity to make good money.
Successful Travel Site Examples
The best way to learn how to start a travel blog is by studying other accomplished travel bloggers. Here are a few great examples:

SANspotter
SANspotter documents Scott Leazenby’s travel adventures, with a particular focus on airlines, airport lounges, and specific flight routes.

The Hawaii Vacation Guide
The Hawaii Vacation Guide helps people make the most out of their vacation to the Hawaiian islands. They share itineraries, recommendations, reviews, and more.

SV Delos
SV Delos teaches aspiring sailors how to travel the world on a sailboat. They share sailing videos, safety tips, and sell their own merchandise.
How To Start a Travel Blog in 10 Steps
Here is a foolproof guide to launching a successful travel site in ten easy steps:
1 Narrow Down Your Travel Blog’s Niche
A niche is a specific, focused area within a given topic. You can cover broad niches — in this case, the travel industry — and smaller sub-niches. For example, some sub-niches in the travel space could be:
- Family Travel: Tips on traveling with small children or a growing family.
- Voluntourism: How to volunteer your time in exchange for lodging and experiences.
- Regional Food Tourism: Food or beverage guides across different regions.
- Van Life Travel: Tips for living and traveling in a van.
At first glance, you may think it’s a good idea to keep your niche broad, but there are two big reasons you should narrow down your niche:
- It’s much easier to be seen as an expert in a smaller sub-niche than in the broader “travel” niche. Being seen as an expert can help your branding and make it easier to grow a following.
- Google rewards sites that focus on small corners of larger niches with higher search rankings.
You can widen your niche as your site grows, but starting with a narrow focus will help you grow your audience and start making money faster.
Ready to find a sub-niche? Here’s how:
First, make a list of all the potential niches you’re considering within the travel space, as well as some competing websites within those niches.
There are a few ways to do this. One method involves searching Google for keywords related to your topic (like “family travel tips”) to find blogs specializing in that niche.
You can also search through blog aggregators like Detailed to find high-traffic sites within your desired sub-niche.

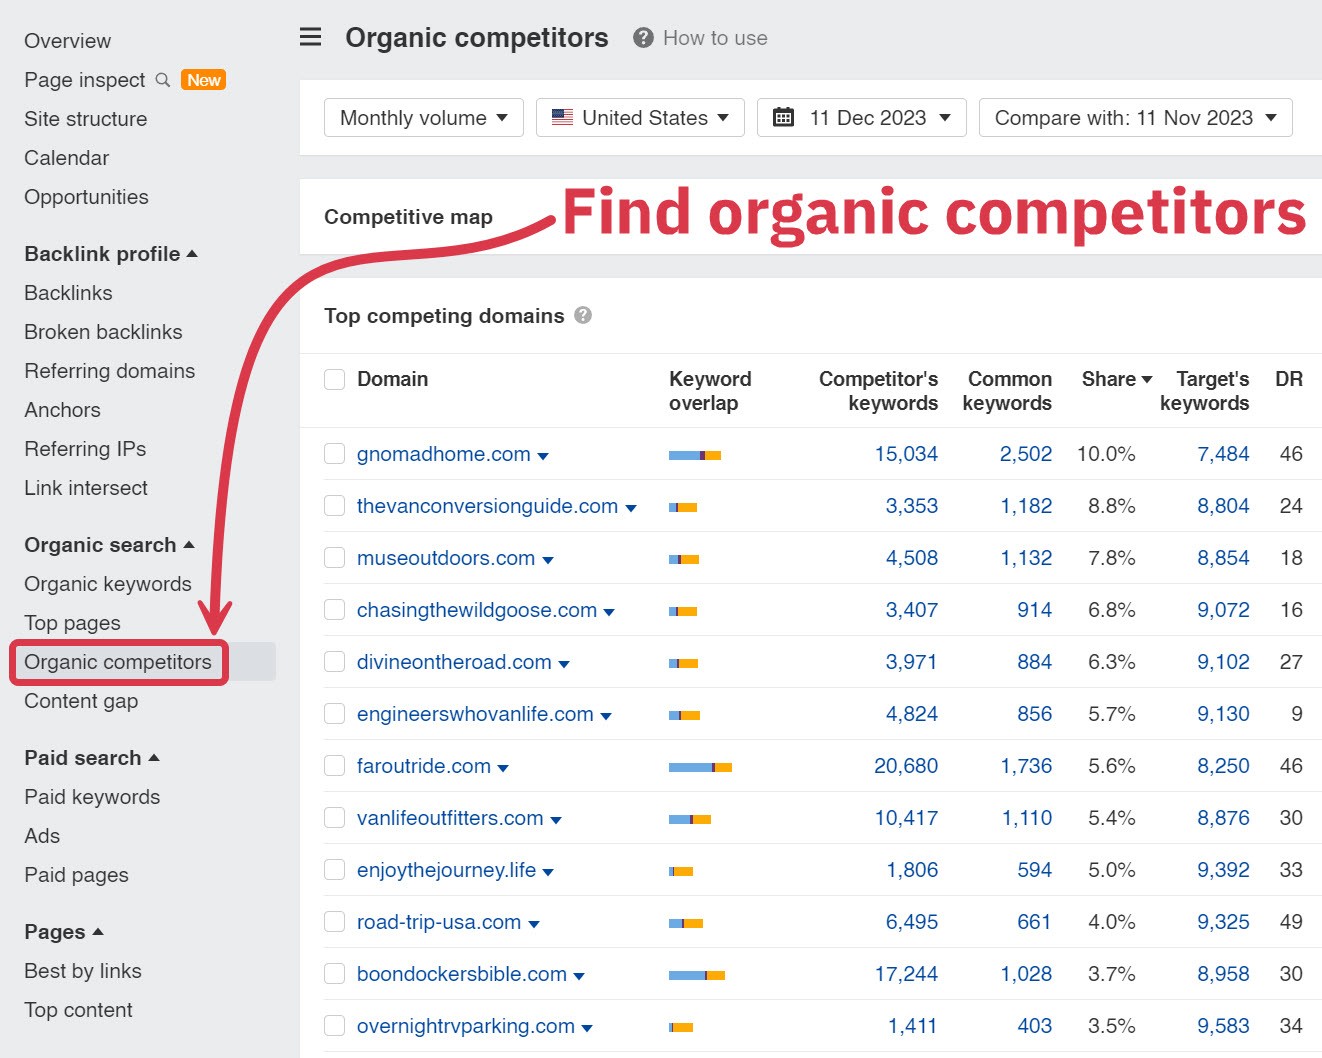
One of our favorite tools for finding competitors and analyzing site traffic is Ahrefs. It lets you type in a competitor’s website and click on the Organic Competitors tab on the left sidebar.
This conveniently brings up a list of that site’s top competitors; add any that seem relevant to your list.
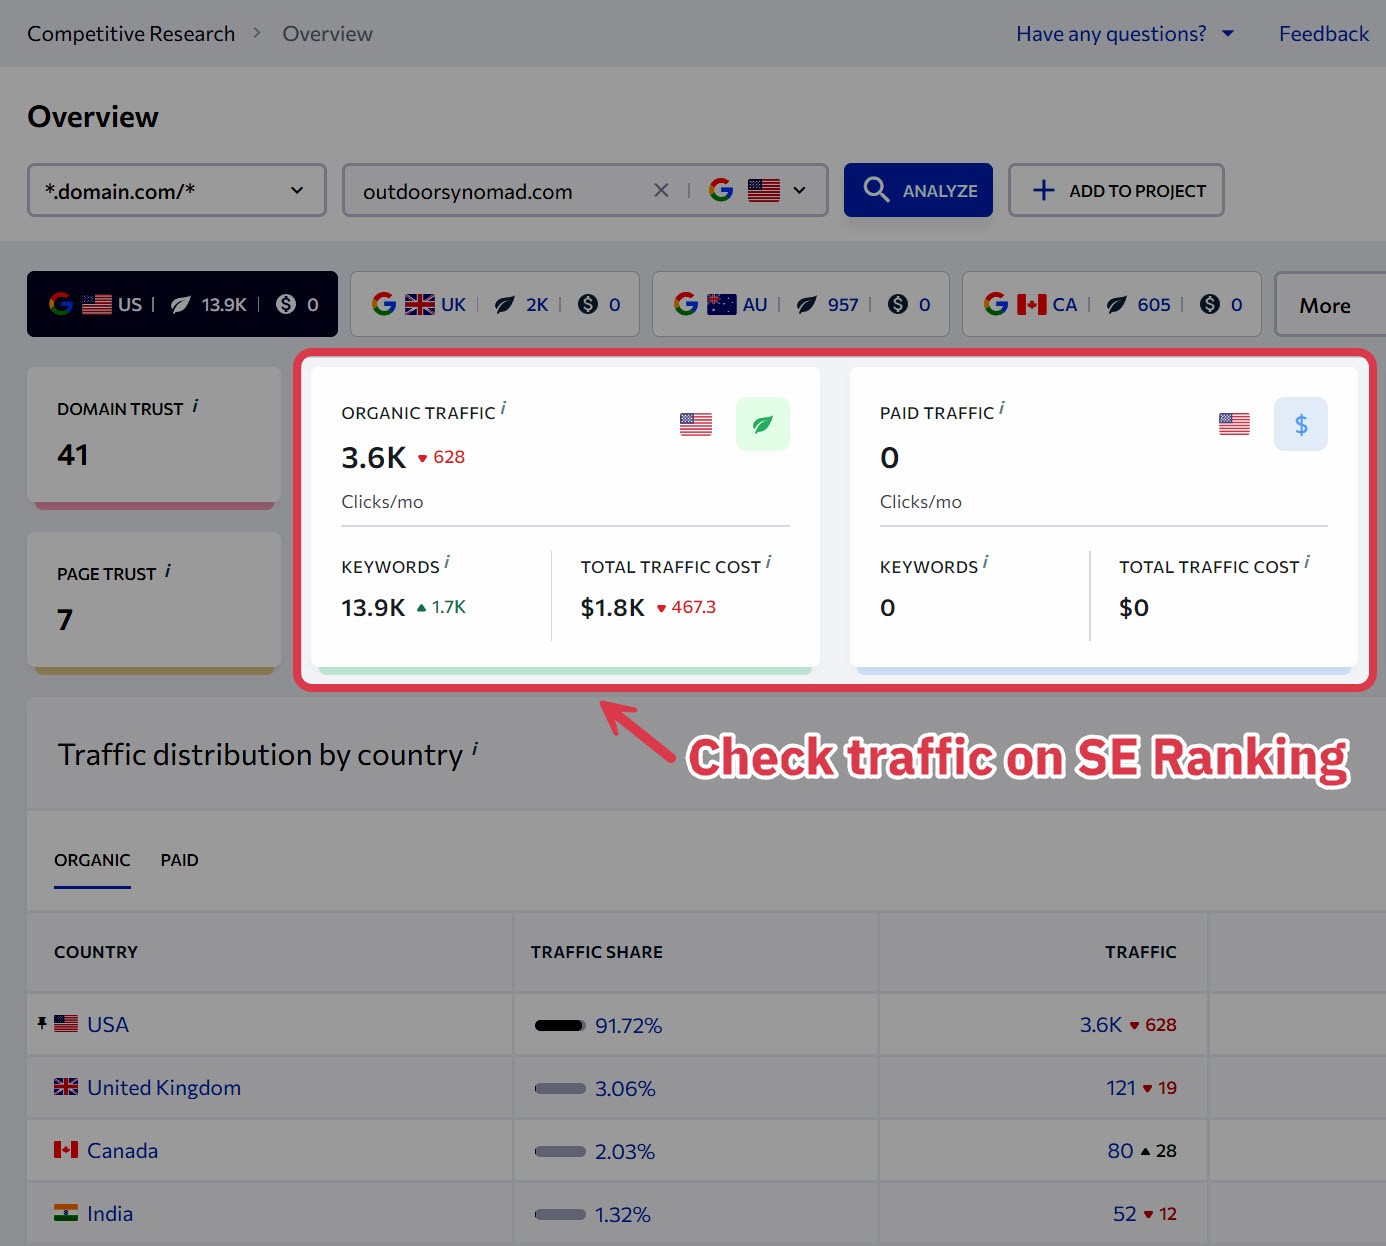
Once you have a list of competitors, the next step is to check the traffic volume for each competing website in the niches you’re considering to get an idea of that niche’s traffic potential.
You can check a website’s organic traffic using the Competitive Research tool on SE Ranking, which offers a free trial.
You can further narrow down your selection by using Google Trends to compare the search traffic of each potential niche.

Choosing your niche is a big decision, and it’s important to feel confident before moving forward. But don’t dwell too long on the decision-making process — chances are, you already know which niche is calling your name the loudest.
If you still need some guidance, check out our in-depth guide to choosing a successful niche:
2 Choose a Blogging Platform
The next step in becoming a successful travel blogger is choosing a blogging platform.
Free social blogging platforms like Blogger and Medium are great for casual bloggers, but they have some major downsides if you’re serious about building a successful travel blog. They severely restrict customization, limit the types of content you can post, and significantly reduce blog monetization options.
Instead, I recommend building your own website. Here’s why:
- You’ll have full control over your site and won’t have to adhere to strict rules and lack of customization options.
- No one can delete your content or shut down your blog.
- You’ll have the flexibility to earn money through affiliate marketing, display ads, and other revenue sources.
- You can use search engine optimization (SEO) to target specific keywords and send traffic to your blog.
- It’s easy to integrate your blog with your social media accounts.
- You can build an email list to create another traffic source and protect your blog from negative Google algorithm changes.
To build your website, I recommend using WordPress.org (not to be confused with WordPress.com). It’s free to use and offers complete control over your site’s design and functionality with thousands of themes and plugins.
3 Choose Your Domain Name
Your domain name is essentially your website’s address on the internet. It includes your website’s name and a domain extension.

A good domain name is important because it builds credibility with your audience and helps them remember you.
So, what should you look out for when choosing a domain name?
- Keep it short and simple. Short domain names are easier to remember. Aim for no more than three words.
- Keep it broad and relevant. You want a domain name that is relevant to your sub-niche but allows for expansion into other areas of your broad niche later on.
- Check social media availability. If you plan on using social media, make sure the name you want is available on all platforms. You can quickly check for username availability on the most popular platforms through Brandsnag.
- Research trademarks: Avoid legal issues by ensuring your domain name isn’t trademarked through the Trademark Electronic Search System.
- Choose a .com domain: A .com domain is familiar to users and provides higher trust than other extensions. If your domain is taken, you can consider using a .com alternative like .org, io, or .net.
- Avoid confusion: Your domain name should be easy to spell and pronounce so users can share your site via word of mouth. Also, avoid using random numbers, underscores, and dashes.
If you’re having trouble brainstorming the perfect domain name, use the free Brandsnap tool to get AI-generated domain suggestions.
Once you’ve found the perfect domain name for your travel site, it’s time to purchase it.
I recommend using Namecheap. They offer domain names for as little as $10 per year.
4 Buy Web Hosting
The next step in becoming a travel blogger is to find and purchase web hosting.
While your domain name points users to your site, a web host stores and makes your website’s content accessible online.
Bluehost is a popular option, as it’s quite inexpensive. However, if you’re aiming for speed, reliability, and top-notch performance, SiteGround is our recommendation.
They offer a steep discount for first-year users, making the price difference between Bluehost and SiteGround negligible.
Here are 7 easy steps to setting up web hosting through SiteGround:
Step 1: Go to SiteGround’s WordPress hosting page
Step 2: Choose the cheapest hosting plan. The StartUp plan offers more than enough features to get you going on your travel site.

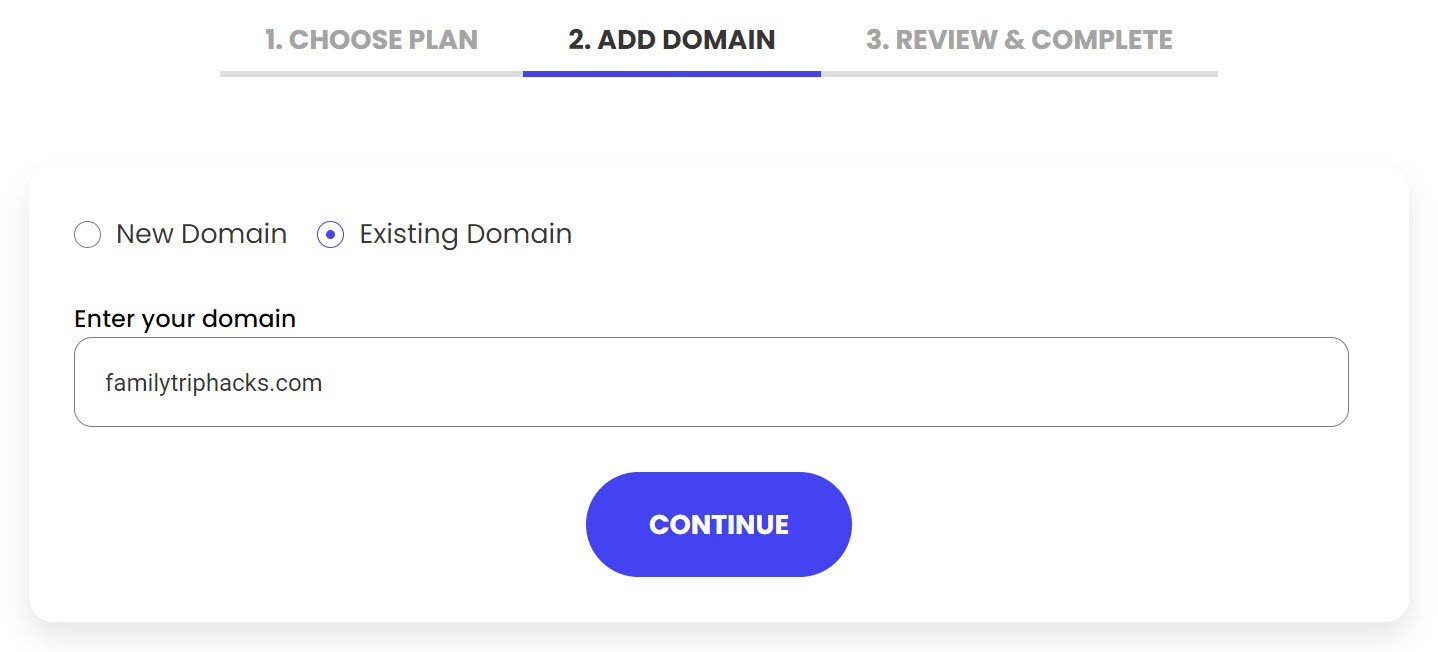
Step 3: Enter your domain name and click Proceed.
Step 4: Enter your account information.
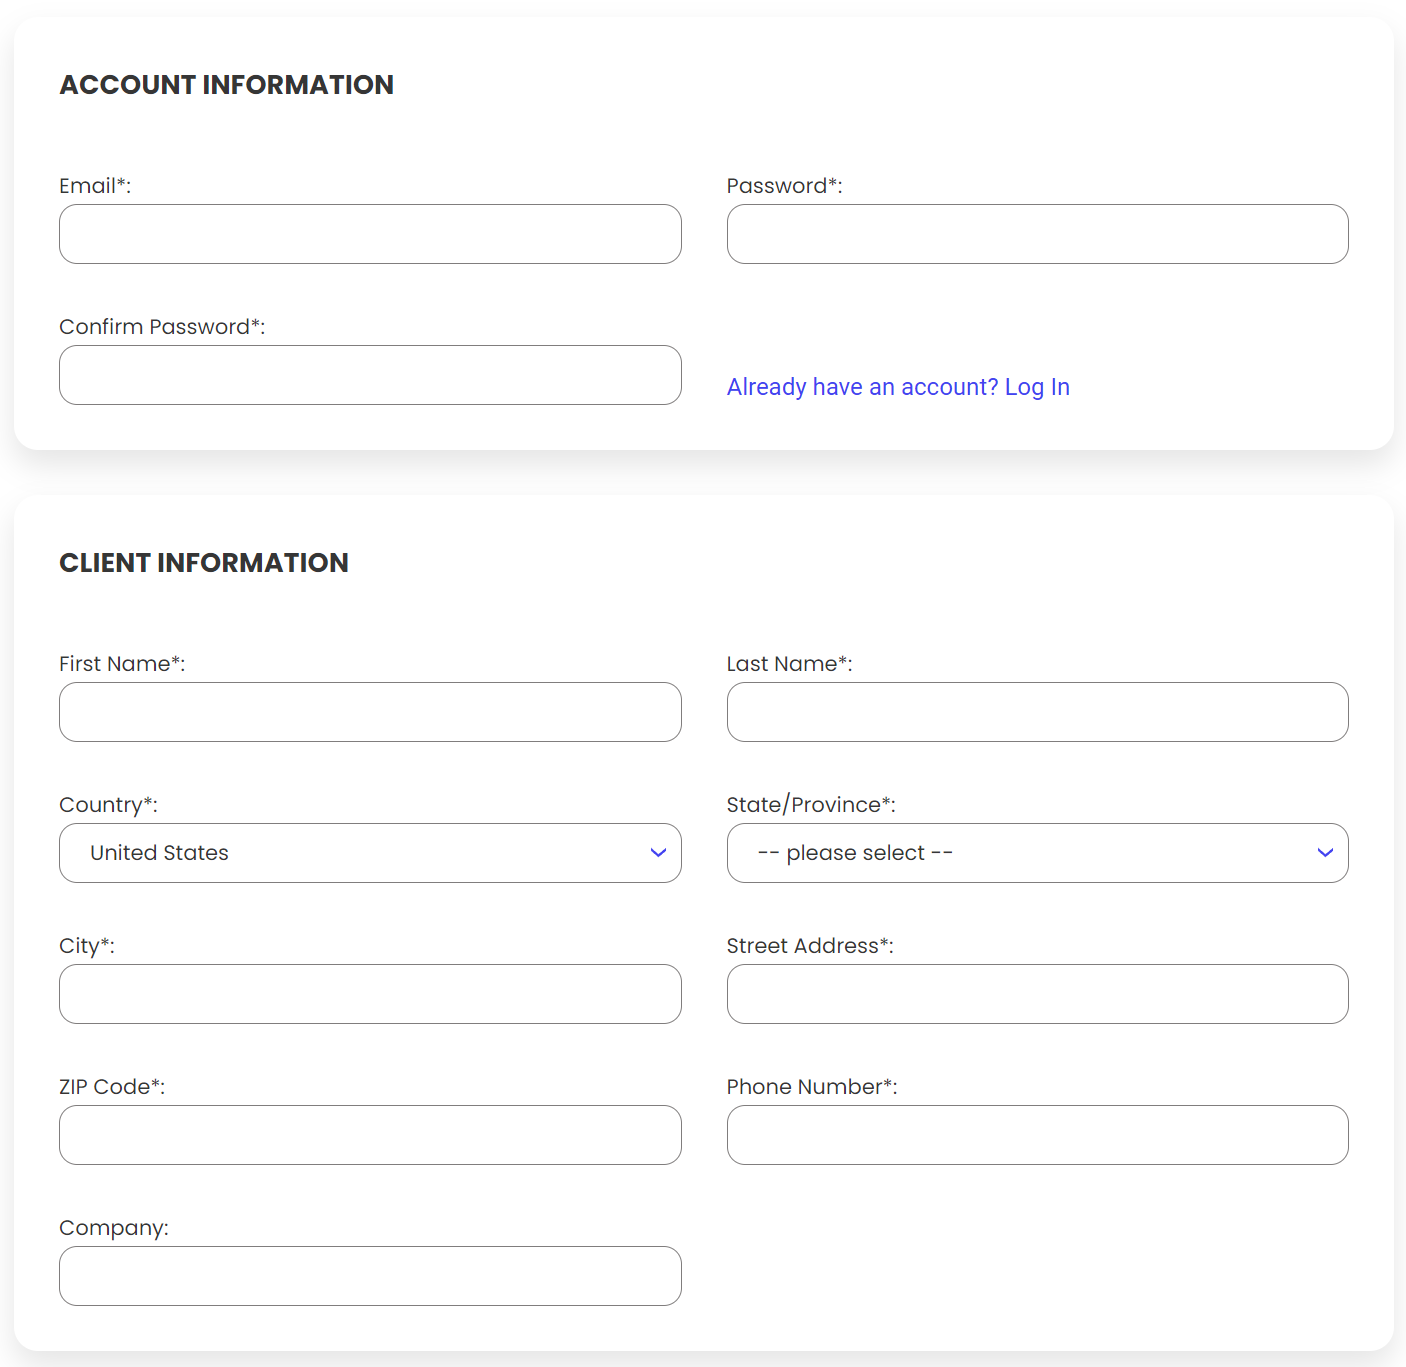
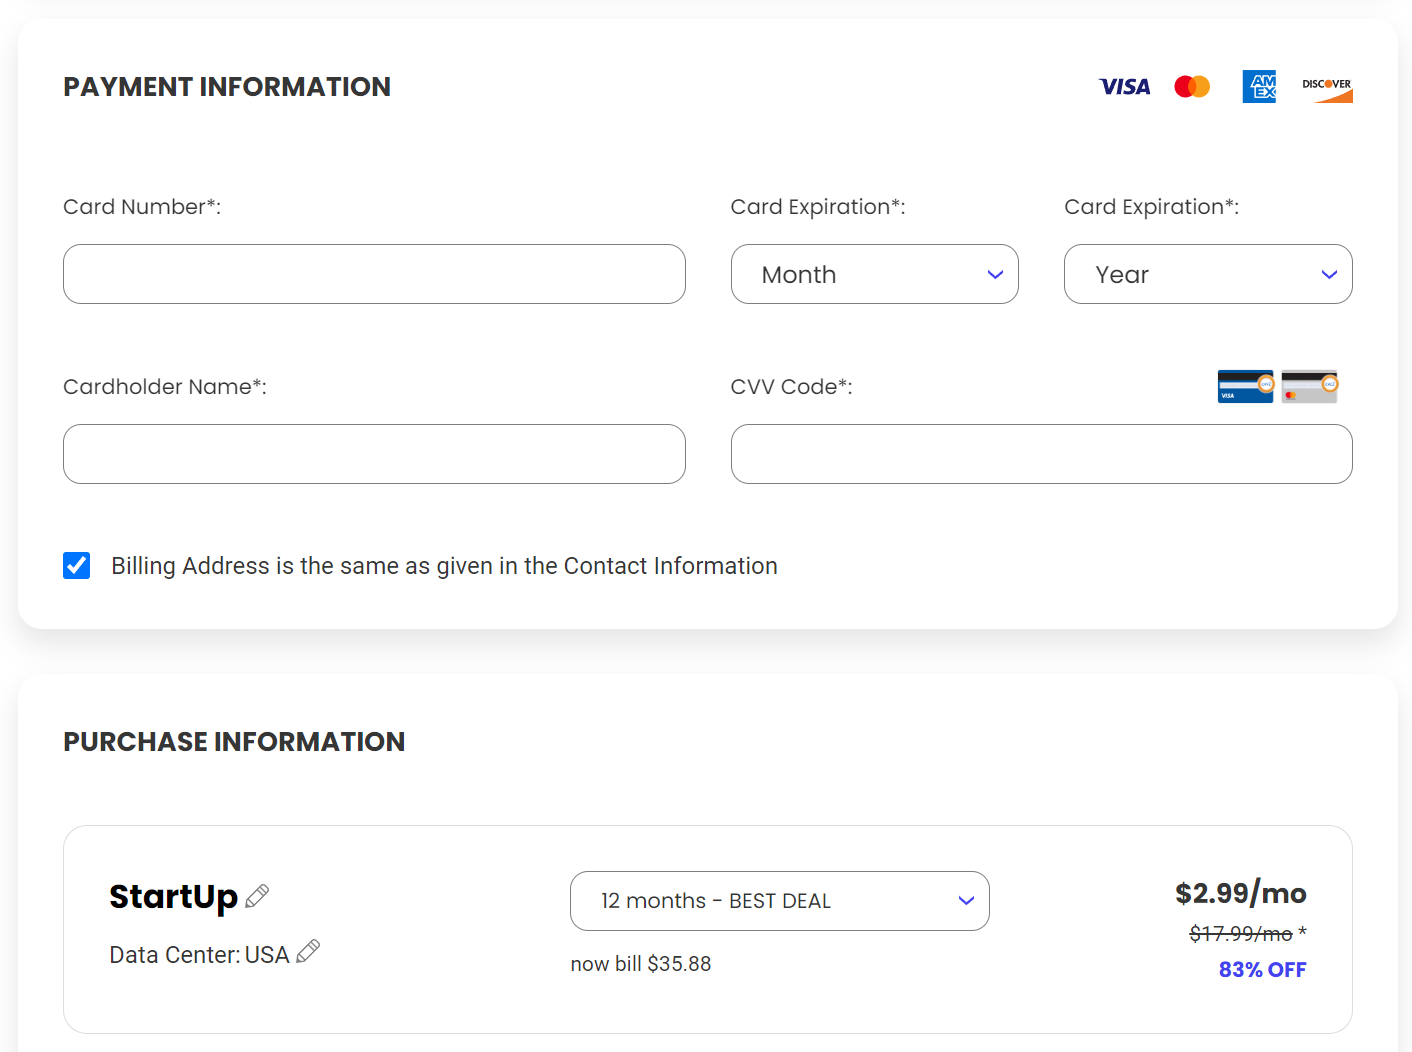
Step 5: Add payment info and choose your package length. The 12-month option generally offers the best deal.
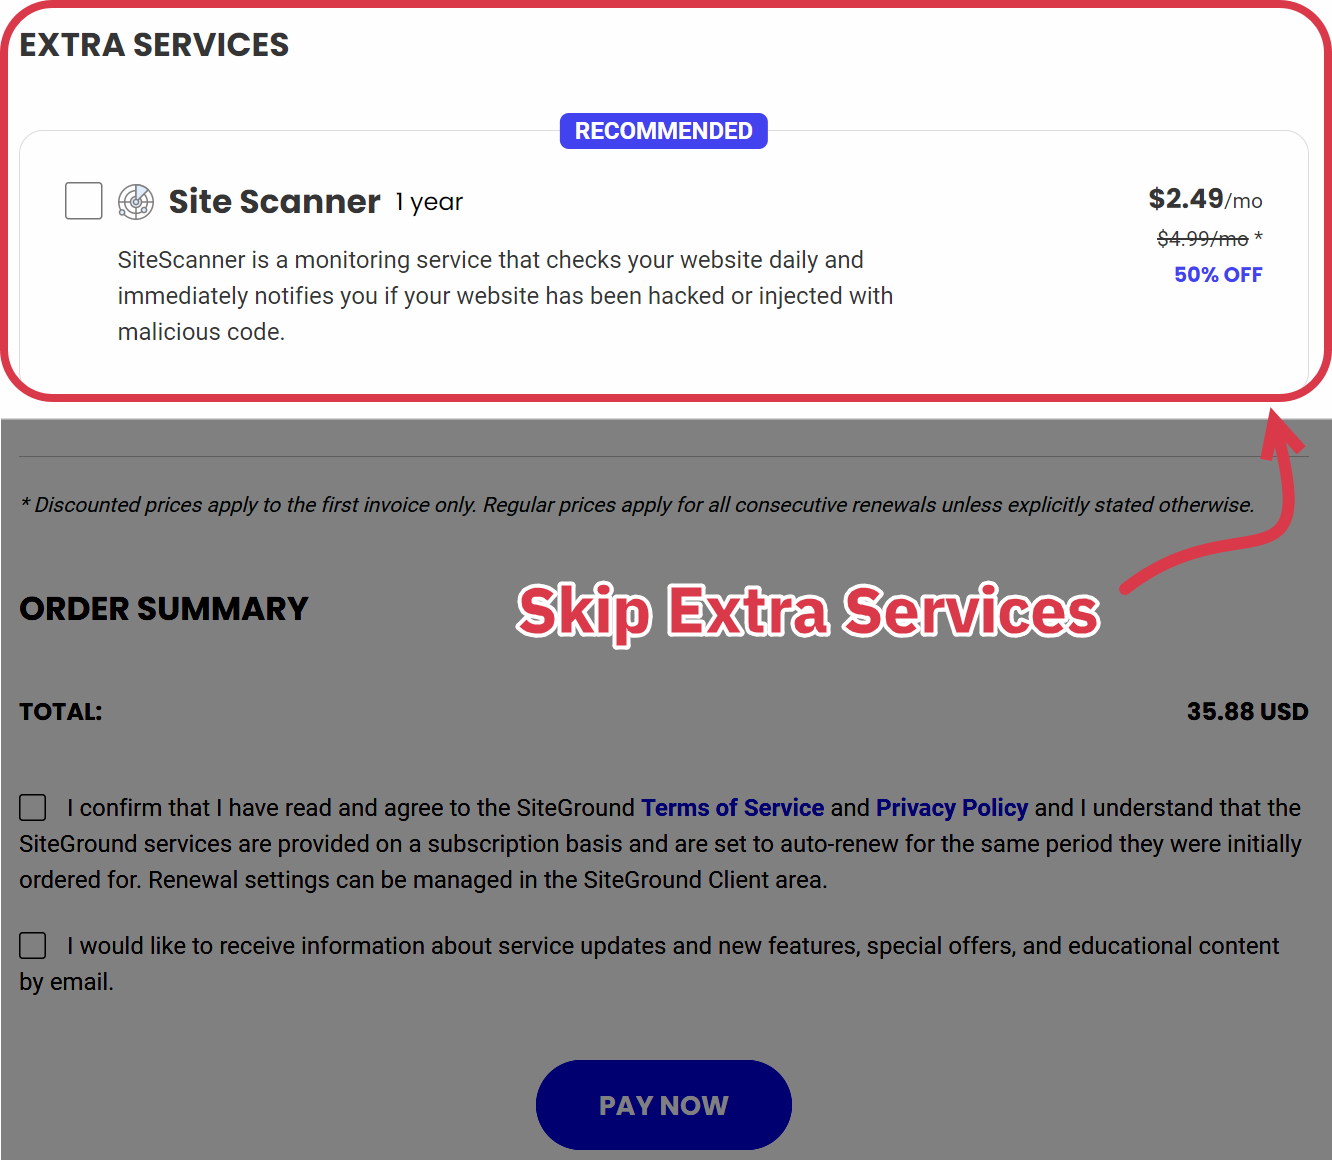
Step 6: Skip the extra services since they are unnecessary for a new site.
Step 7: Point your domain name to SiteGround. This is done through the DNS settings on Namecheap (or wherever you purchased your domain name). If you have any issues, just contact SiteGround’s support team.
Congratulations! This wraps up the more tedious side of starting a new site.
5 Choose a Theme for Your Travel Blog
Choosing a theme is the first step in curating your site’s aesthetic.
Your theme will affect almost every aspect of your site, including user experience, mobile responsiveness, functionality, and even security. You can always change it later, but we highly recommend choosing a great theme from the beginning.
I recommend choosing a free theme that offers a premium upgrade option. Free themes are fine for starting, but they have limitations that will hamper your blog’s growth.
A “freemium” theme lets you save money at the beginning and avoid the complexities of switching themes later on.
You’ll also want your theme to be visually interesting and convey the right message to your audience. However, most themes make it easy to change colors, branding, photos, and layout, so this isn’t a huge factor.
Therefore, you should prioritize features like speed, customer support, seamless plug-in integration, and easy customization.
Our favorite free themes for new sites are Astra, Kadence, and GeneratePress. They offer premium upgrades and are remarkably fast, easy to customize, and have great support teams.
Once you’ve decided on the perfect theme for your travel blog, it’s time to install it. There are four easy steps to have your theme up and running in just a few minutes:
Step 1: Go to the WordPress dashboard.
Step 2: Go to the left sidebar and select Appearance > Themes
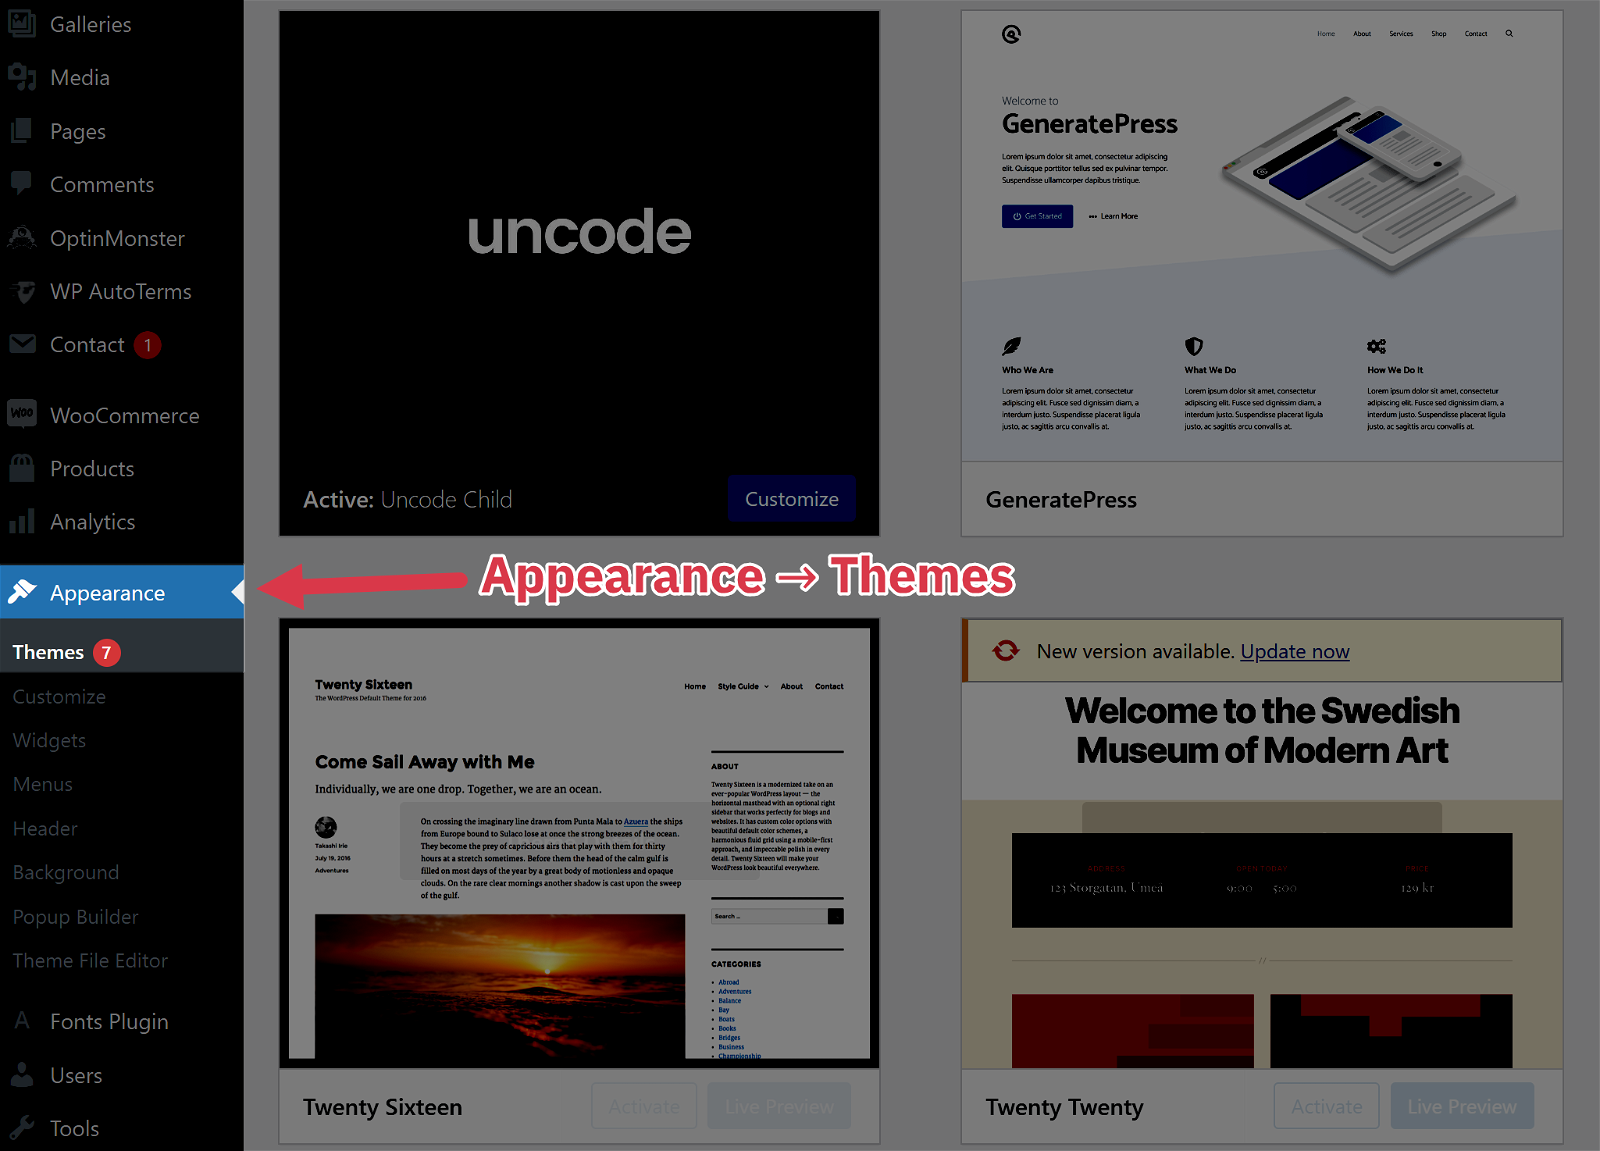
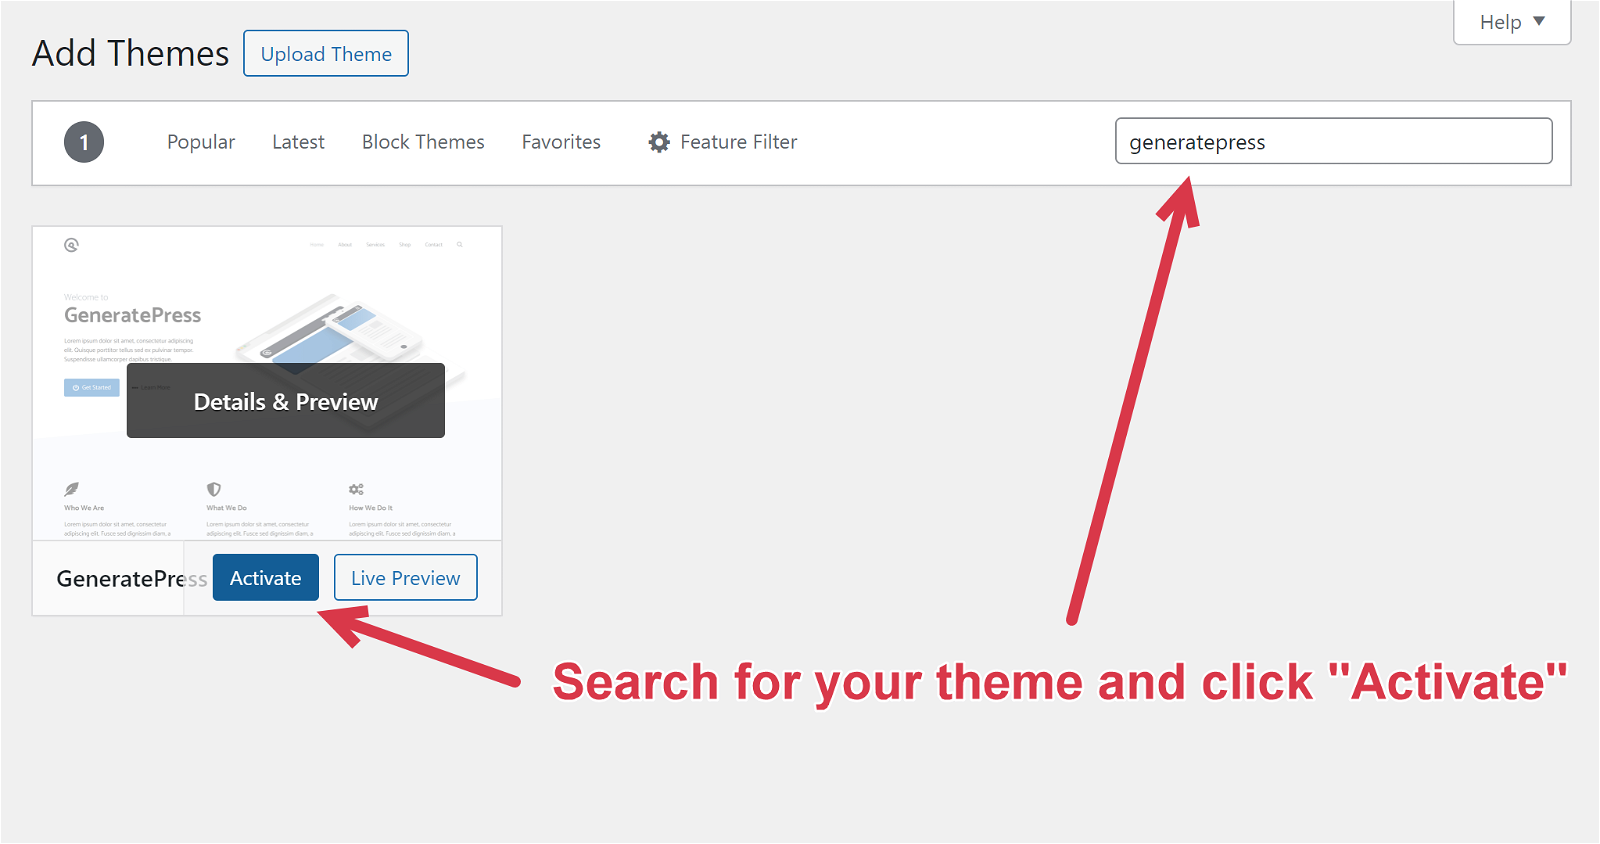
Step 3: Click “Add New”
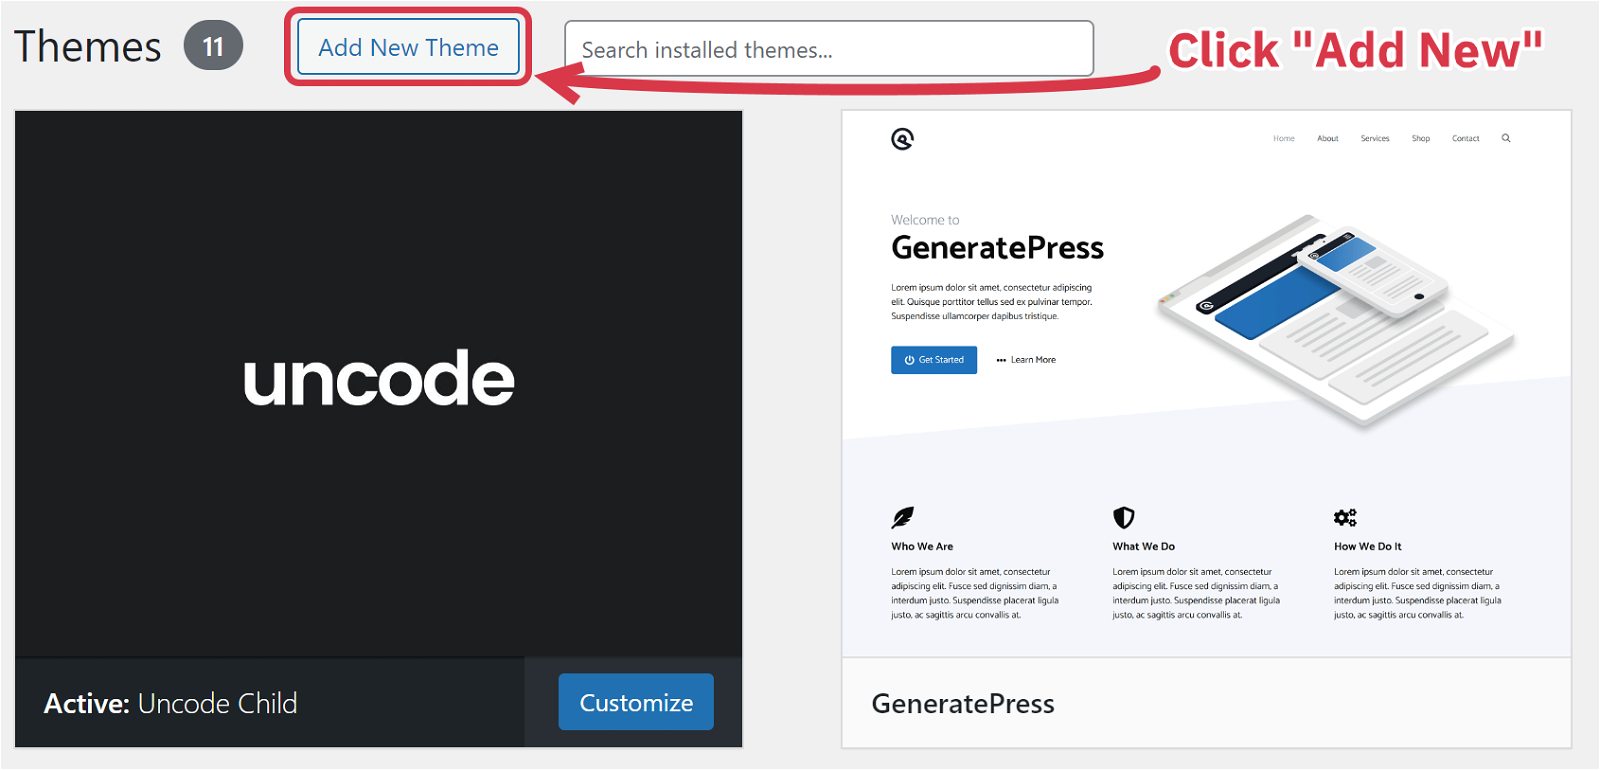
Step 4: Search for the name of your chosen theme and click “Activate.”
6 Decide on Design & Branding
Design and branding will help your WordPress site stand out and provide a much-needed personal touch. This will include customizing a color palette, creating a logo, and ensuring your site has a cohesive design.
Your color palette should reflect the vibe of your travel sub-niche. For example, an eco-tourism travel blog can use earthy tones like forest green, deep brown, and muted clay to echo the natural environments that the content focuses on. Alternatively, a luxury travel blog might use a palette of rich gold, elegant black, and crisp white to evoke a sense of sophistication and opulence.
Our favorite tool for choosing harmonious and beautiful color palettes is Coolors.
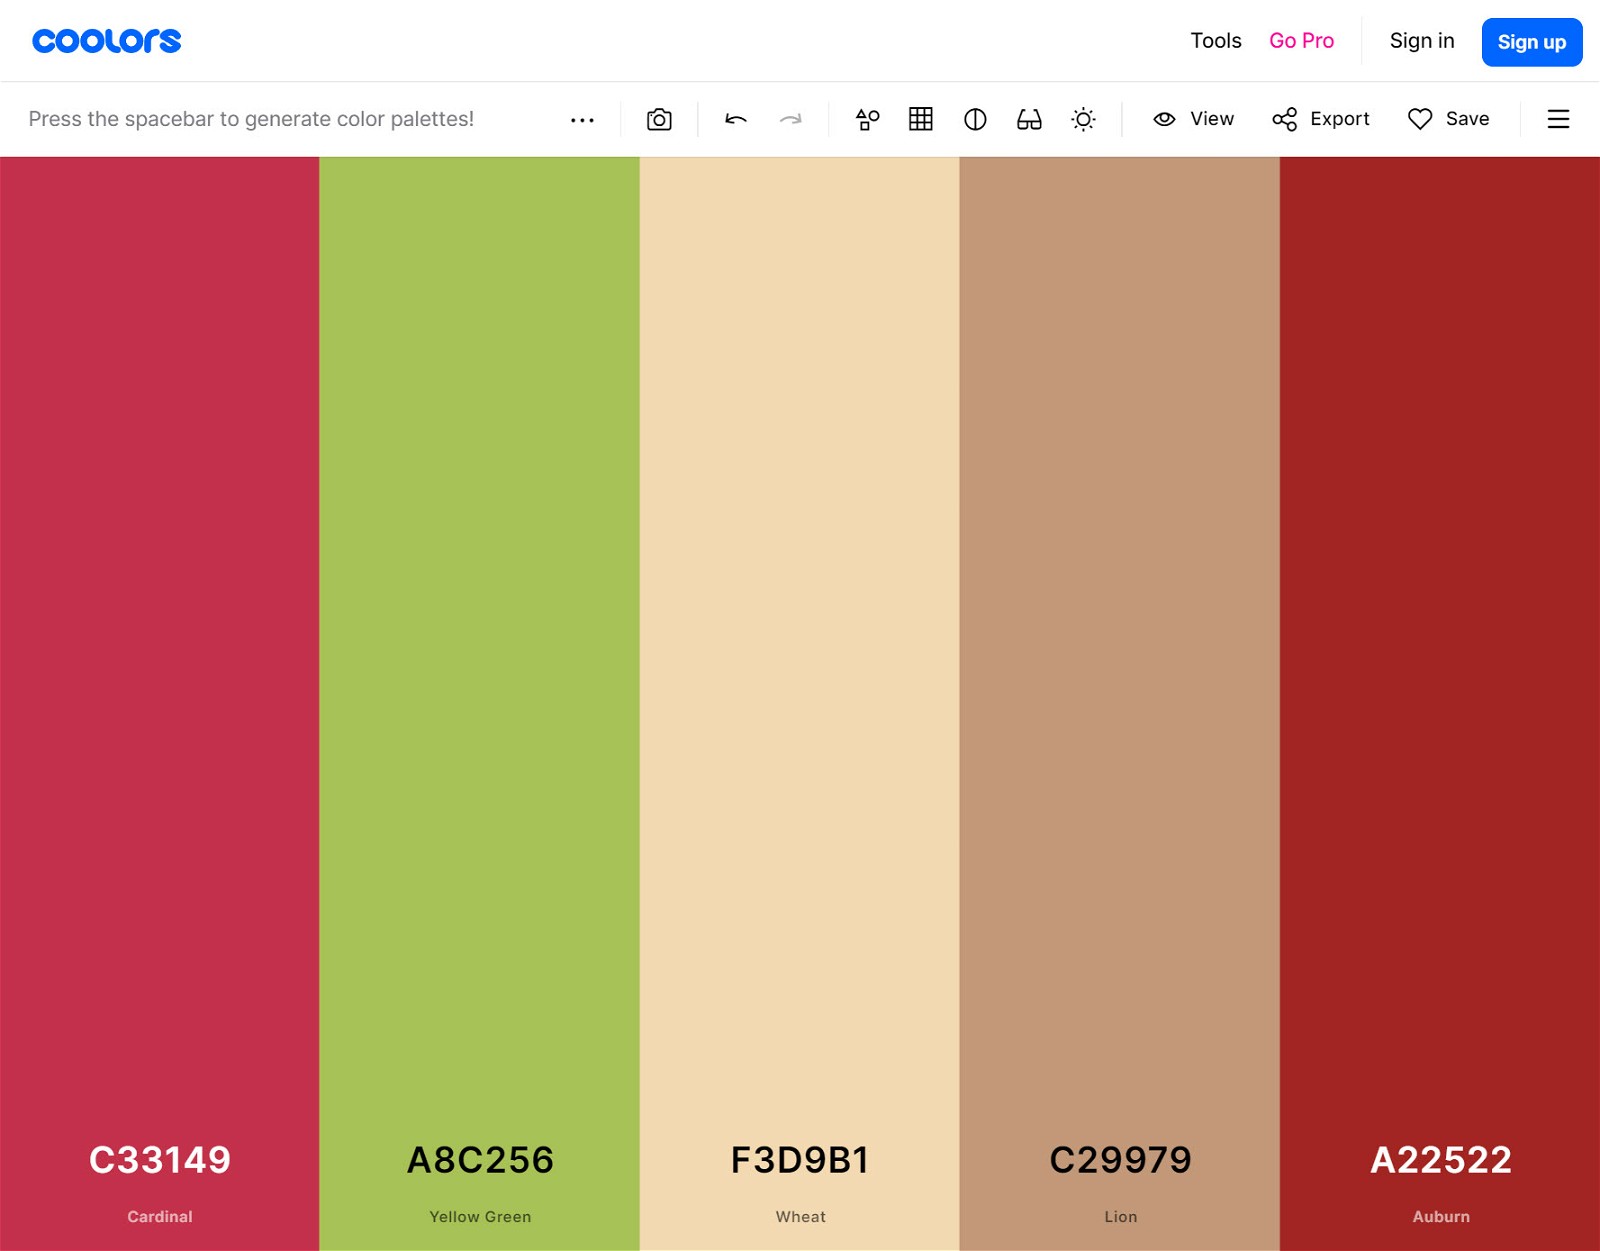
Just tap the spacebar, and it’ll curate beautiful color palettes in seconds. You can save entire palettes or individual colors. Jot down the six-digit color code for each of the colors you choose.
Next, you’ll need a logo.
It’s important to create a logo that is professional, relevant to your niche, and sets the tone for what your audience can expect from your site.
Canva makes creating a beautiful logo quick and easy. Their free tier has tons of great logo templates you can use.
From here, you can customize your logo with your site’s name, color palette, and any other necessary tweaks to reflect your brand’s image and unique personality.
7 Create Essential Pages
Next up, you’ll want to create the essential pages for your travel blog. This will help give your readers a way to contact you, learn more about you and your brand, and cover some important legal information.
Homepage
Your homepage is the “home base” for your blog. It should help your audience easily navigate your site, and it’s a great place to showcase content, build trust, and reinforce your brand identity.
About Page
Your About page is where you’ll share your story and what prompted you to start a travel blog. The more personable and relatable you can make your about page, the better.
Share your background, photos, personal stories, and anything else that will instill trust in your readers.
This is one of the most important pages on any site, so it’s best to take your time to make it shine. Here are some killer about me page examples for inspiration.
Contact Page
This is where readers and potential collaborators can directly contact you. At the least, this page should include either a contact form or your email address.
This is also a great place to include links to your social media accounts.
Privacy Policy + Terms and Conditions
Did you know that you’re legally required to outline how a website collects, uses, discloses, and manages the personal information of its users?
To comply with this, make a Privacy Policy and Terms and Conditions page using PrivacyPolicies.com.
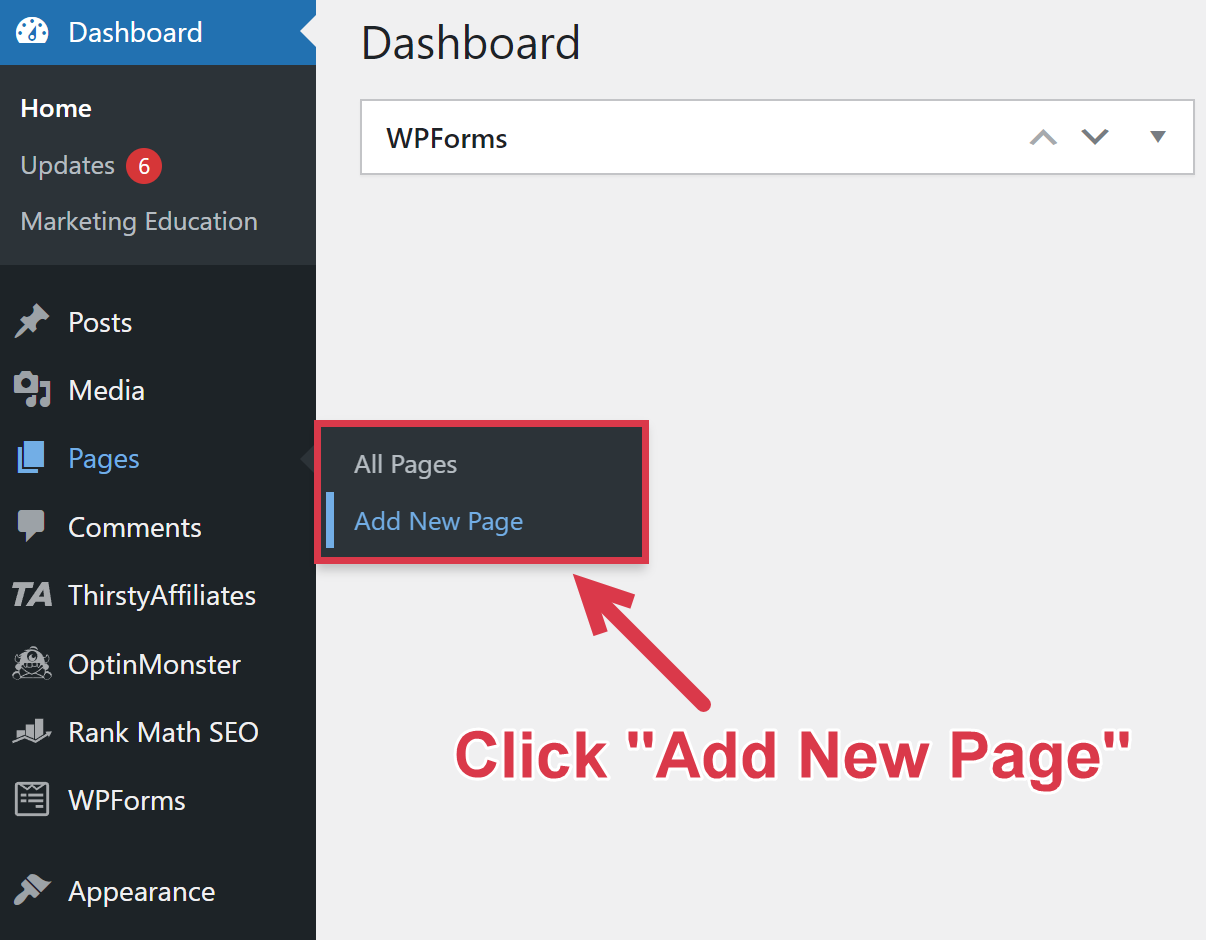
Creating a new page in WordPress only takes a couple of seconds. Just log in to your account and click Pages > Add new on the left-hand side of your dashboard.
8 Start Creating Content
Now that you’ve created your site, it’s time to start creating content.
The best way to do this is to create keyword-focused content that people are searching for on Google. If you can rank well for search terms, you’ll get traffic that you can convert into revenue.
However, you can’t simply write about the highest-traffic keywords and expect to rank. The higher the traffic potential, the more competition from big websites. A new blog will have a hard time competing for the best terms.
That’s why I recommend finding low-competition keywords with decent search volume. You won’t get as much traffic as the biggest keywords, but your new travel blog actually stands a chance of ranking.
Tools like Ahrefs make this super easy to do.
Let’s say you want to create a site that teaches people how to live in a van. If I type “van life” into Ahrefs’ Keywords Explorer tool, I get matching terms and topics like:
| Keyword | KeywordSearch Volume | Keyword Difficulty |
|---|---|---|
| Best vans for van life | 1.5k | 6 |
| Living the van life | 450 | 22 |
| Van life essentials | 700 | 7 |
| Van life shower | 300 | 4 |
You can then use these keywords to develop article ideas that have a shot at ranking.
For example, based on the keywords above, some of your first article titles could be:
- “The 10 Best Vans For Vanlife”
- “50 Van Life Essentials You Don’t Want To Forget”
- “The Best Van Life Shower Ideas For Your Build”
Once you’ve come up with 10 article titles, it’s time to start writing the content. Here are a few tips to help you write engaging, search-optimized content for your travel blog:
- Know your audience. If you specialize in budget backpacking, you want to promote products and experiences that resonate with that purpose. You likely wouldn’t promote luxury hotel experiences or high-end gear.
- Share personal photos. You don’t need to be a professional photographer. Google loves original images, and your iPhone is more than capable of capturing quality images. Share your relevant photos that you’re proud of wherever you can.
- Stay on topic. Your readers will love to read about your adventures and stories, but remember that they clicked on your article to answer a question or find a solution. Make sure you give your readers the answers they’re looking for in an easy-to-digest way.
- Go the extra mile. People want the best tips, insider knowledge, and up-to-date information. Be sure you create quality content so your readers know they can look to you as an expert.
- Be conversational. Talk to your readers as if they’re a next-door neighbor.
- Make it scannable. Readers looking for specific answers tend to scan the page. Use headings and bold words to help your audience find information quickly, as they might click away if they can’t locate the information they need.
- Share stories. The beauty of having a travel blog is that your readers likely have a severe case of wanderlust, too. Personal stories are a great way to stoke that fire and keep your audience coming back for more.
- Travel. Visiting travel destinations allows you to share firsthand tips, photos, and insights.
Hopefully, this inspires you to create the most engaging and helpful content you can. Not only will Google reward you with front-page rankings, but it’ll keep your audience regularly coming back for more.
9 Promote Your Travel Blog
There’s so much more to building an audience than clicking “post” and crossing your fingers. It’s important to start spreading the word about your site and getting eyes on your content.
Here are five actionable ways you can promote your site today:
- Collaborate with the community: If you’re writing in the van life niche, you can make a blog post sharing beautiful van builds or telling stories from other van lifers on social media. Be sure to send them an email and tag them in your post. They’ll likely be excited to share your article with their own followers.
- Engage in travel forums: Find Facebook groups and Reddit forums in your niche and share any of your content that can help answer a question someone may have.
- Leverage social media: Platforms like TikTok and Instagram push content to the people they think will benefit from a post. Share helpful tips and tricks, stories, and inspiration that lure readers to your site. Videos tend to outperform photos or text posts on these platforms.
- Build an email list: Offer incentives like a free travel guide or exclusive tips to prompt readers to sign up for your newsletter. Since you own your email list, it’s one of the best long-term growth strategies for any blog.
- Write guest posts: Find other websites in a similar niche and offer to write a guest post. This will encourage their audience to visit your travel blog, and backlinks can boost your SEO.
However you promote your blog, ensure you’re being helpful and not just posting your content to promote it. People don’t like spammy, unsolicited promotional tactics.
10 Monetize Your Travel Blog
There are a few ways to start making money with your blog. It will likely take several months of diligent posting, but you can make money on your WordPress blog if you stick with it.
Some of the most popular ways to monetize your travel blog are:
Affiliate Marketing
Promote other people’s products and earn a commission when someone makes a purchase.
Why It’s Great: You can earn from products your audience is interested in without having to deal with the complexity of selling your own product.
Get Started: One of the easiest ways to start affiliate marketing is through Amazon Associates, but there are plenty of travel affiliate programs you can join to start earning money.
Affiliate marketing is as easy as signing up, promoting products, and getting your audience to buy. Read our guide on how to start affiliate marketing if you want to learn more.
Display Ads
Show advertisements on your blog and earn money every time your audience views or engages with an ad on your site.
Why It’s Great: As long as you drive traffic to your site, you’ll make money. Ads are a great supplement to other monetization methods and can earn a substantial amount on their own if you get enough visitors.
Get Started: The Ezoic ad network is a good option for new blogs, as there’s no traffic minimum to sign up. However, you should switch to a better network like Mediavine (50,000 minimum monthly pageviews) or Raptive (100,000 minimum monthly pageviews) once you meet their traffic requirements.
Selling Your Own Products
Develop and sell digital or physical products your audience is interested in.
Why It’s Great: Selling products is usually much more profitable than other monetization methods. Once you’ve built up a base of income from ads and affiliate recommendations, launching a product is a great way to take your revenue to the next level.
Get Started: You can consider selling travel guides, printable maps, travel budgeting spreadsheets, photography prints, courses, and more. You can sell these directly on your website or through a third party like Etsy or Teachable.
Sponsored Content
Partner with brands to promote their products in your blog posts or other content.
Why It’s Great: Sponsors will pay you upfront for the privilege of publishing a favorable post on your blog. They’ll often write the post for you as well, making it an easy way to earn extra cash.
Get Started: Make a “Work With Us” page on your blog that advertises you’re open to sponsored content. Share basic information about your readership, such as demographics and monthly traffic. Check out Pinch of Yum’s Sponsored Content page for more information.
Summing Up
Starting a travel blog is an exciting journey with real earning potential.
But let’s face it: the steps outlined in this article are just the beginning.
To truly excel and turn your blog into a profitable business, you’ll need to dive deeper.
That’s why we’ve created a free training packed with advanced strategies. You’ll learn seven key secrets that can boost your blog’s success rate by 83%.
Ready to level up your travel blogging game?
FAQs
Travel bloggers get paid quite a lot. In fact, the average travel blogger earns $13,847 per month. The most common ways to monetize your blog include affiliate marketing, display ads, and selling your own products.
It can cost as little as $35 to start a travel blog. The only mandatory purchases are a domain name and web hosting, though expanding your blog’s functionality will add hundreds to the overall cost.
A professional travel blogger can earn money through affiliate marketing, display ads, selling digital or physical products, and making courses for other travelers.
Nomadic Matt is regarded as the highest-paid travel blogger, earning more than $750,000 per year. He is a New York Times best-selling author, affiliate marketer, course creator, and devout traveler.