Not so long ago, it seemed like every affiliate and his dog was focused — almost exclusively — on creating Amazon affiliate websites.
But with reduced commission rates — and product review related Google updates — Amazon’s program has lost some of its shine.
While it’s true that Amazon Associates may be past its heyday, it’s still one of the very best affiliate programs around. And affiliate marketing websites are continuing to make real money with it.
In this article, I’m going to take a look at seven Amazon affiliate website examples that are still crushing it in 2025 (and probably beyond).
But first, let’s address the elephant in the room…
Amazon Affiliate Websites AREN’T Dead
There is a general trend with larger affiliate programs: initially, the commissions start high and decrease over time as the company expands.
Why? Affiliate programs aim to attract new customers, especially in the early days. But as the company expands, they rely less on affiliate referrals. Eventually, someone crunches the numbers and suggests cutting commissions to save money. If the first cut doesn’t hurt the business, they’ll keep doing it.
And that’s exactly what’s happened/happening with Amazon. An excellent analysis by Geniuslink showed that the average commission rate on Amazon peaked in mid-2012 at 9.25% but had fallen to 3.14% in early 2020.
And while we can mourn the loss of such mountainous commission rates, we have to accept the fact that this is a trend that is likely to continue.
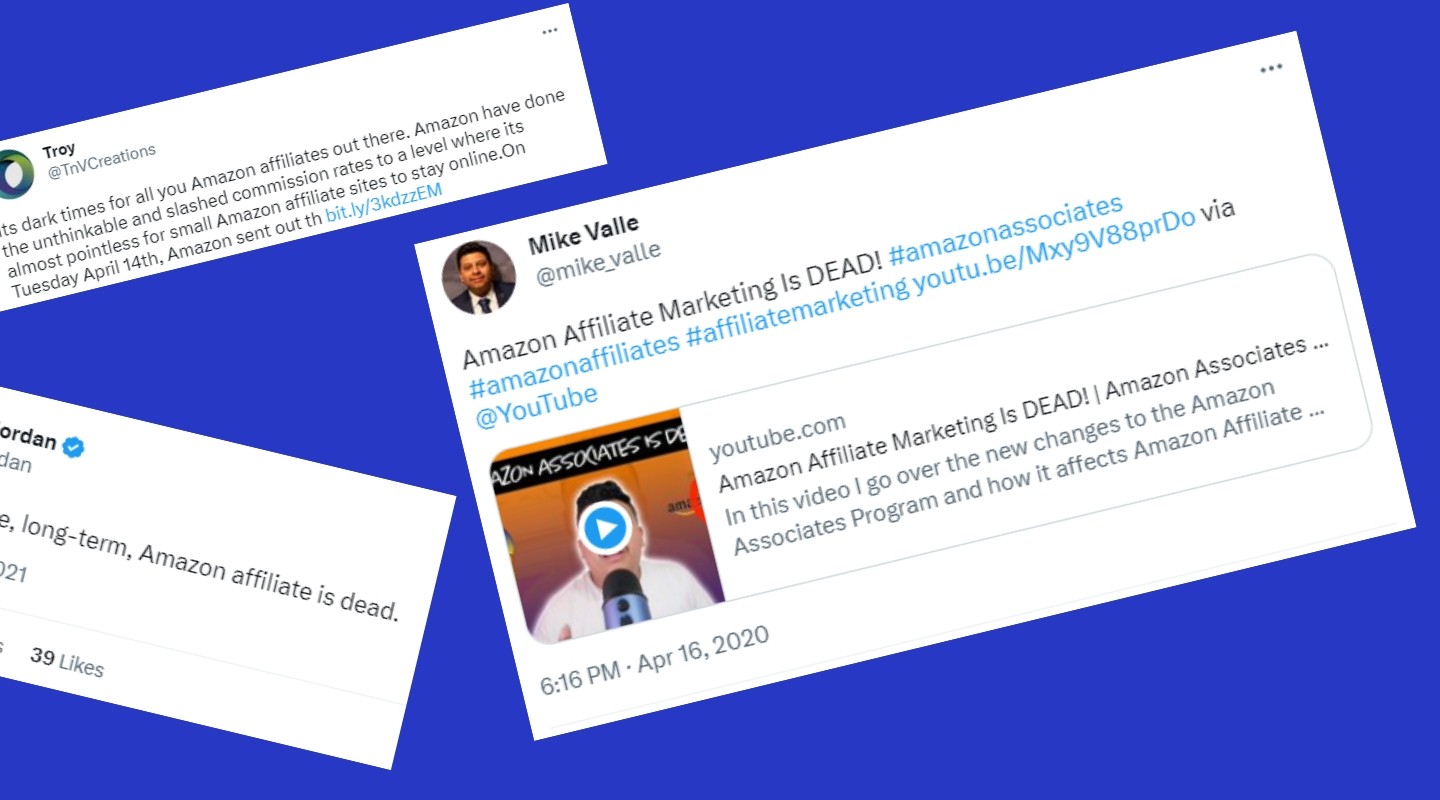
But despite this, Amazon Associates is not dead. Far from it.
There’s a case to be made that it is still the best affiliate program around.
It’s also the most popular affiliate program out there, with 58.5% of affiliate marketers using it according to our affiliate marketing statistics page.
Why?
Because it converts like crazy.
I use dozens of different affiliate programs for the niche websites I run and while Amazon is far from offering the highest commission rates, the conversion rate obliterates the competition.
Amazon Conversion Rate vs Other Affiliate Programs
To prove how good Amazon’s conversion rate is compared to other programs, here’s my actual data from 2022.
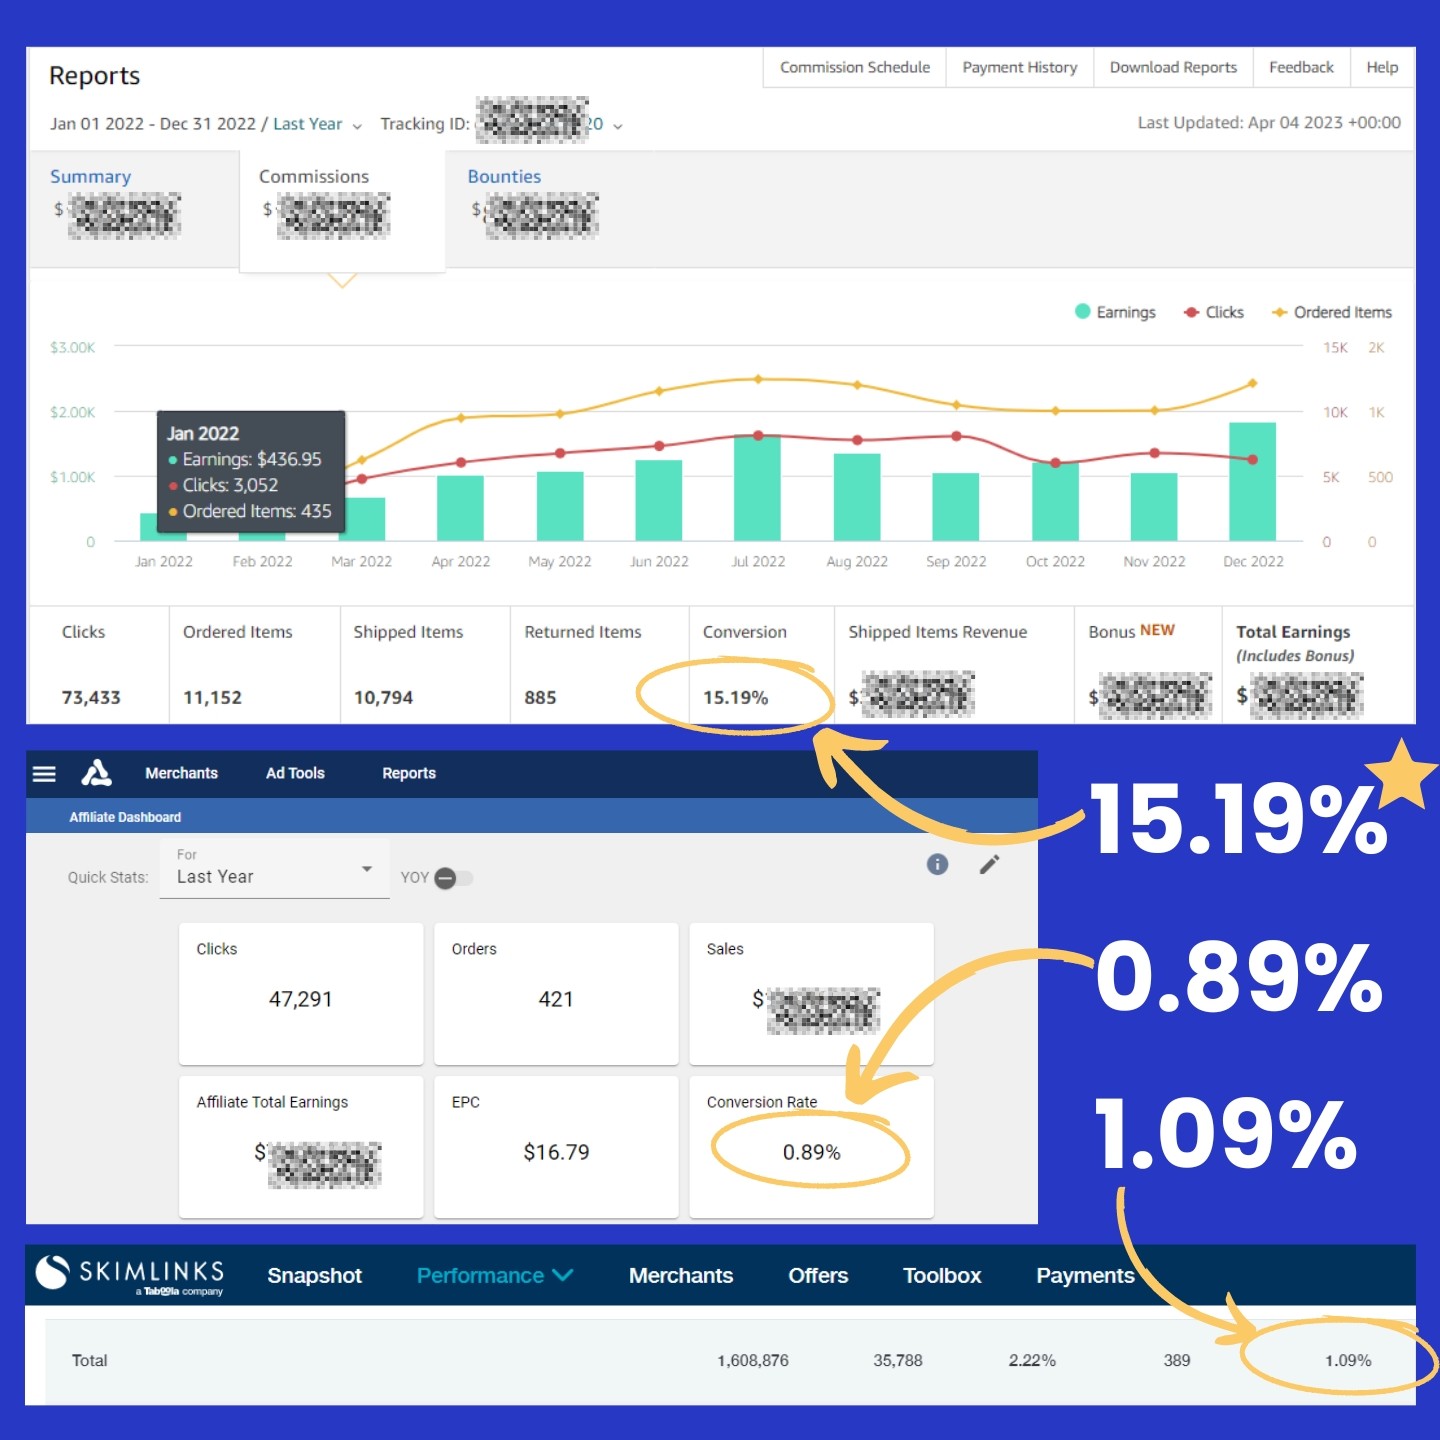
In 2022, my Amazon affiliate links converted at an impressive 15.19%. To give that some context, the second and third most clicked affiliate programs I use frequently (Avantlink and Skimlinks) converted at a meager 0.89% and 1.09% respectively — which is pretty standard across the affiliate industry. That means Amazon converted 15x more sales than the rest of our affiliate programs.
So even if Amazon offered just a 1% commission rate, other programs would need to offer 15% just to make you the same earnings.
That’s why Amazon remains — arguably — the best affiliate program. And that’s before you even factor in other benefits such as their vast range of products, additional cart value (i.e. people purchasing items other than the products you recommend) and its global presence.
Amazon Affiliate Program: Pros and Cons
Highest conversion rates (by a mile)
Huge range of products
Multiple geos
Extremely easy to create links
Regular, automated payments
Not the highest commission rates
Short cookie life (24 hours)
Limited data and tracking capabilities for affiliates
With all that in mind, you might be wondering: “Okay, so how do I start earning big with Amazon?”
A valid question, beautiful reader.
Luckily, we have plenty of real-life success stories to learn from about people actually making a killing on Amazon.
7 Amazon Affiliate Website Examples
Below, I’m going to run through seven sites that are absolutely crushing it with Amazon affiliates. We’ll explore their strategies and reveal insider tips that you can apply to your own business.
I’ll show you:
- Traffic stats for each site
- A breakdown of their Amazon game plan
- Words of wisdom from the website owners on why they chose Amazon affiliates
- Things you can apply to your own site
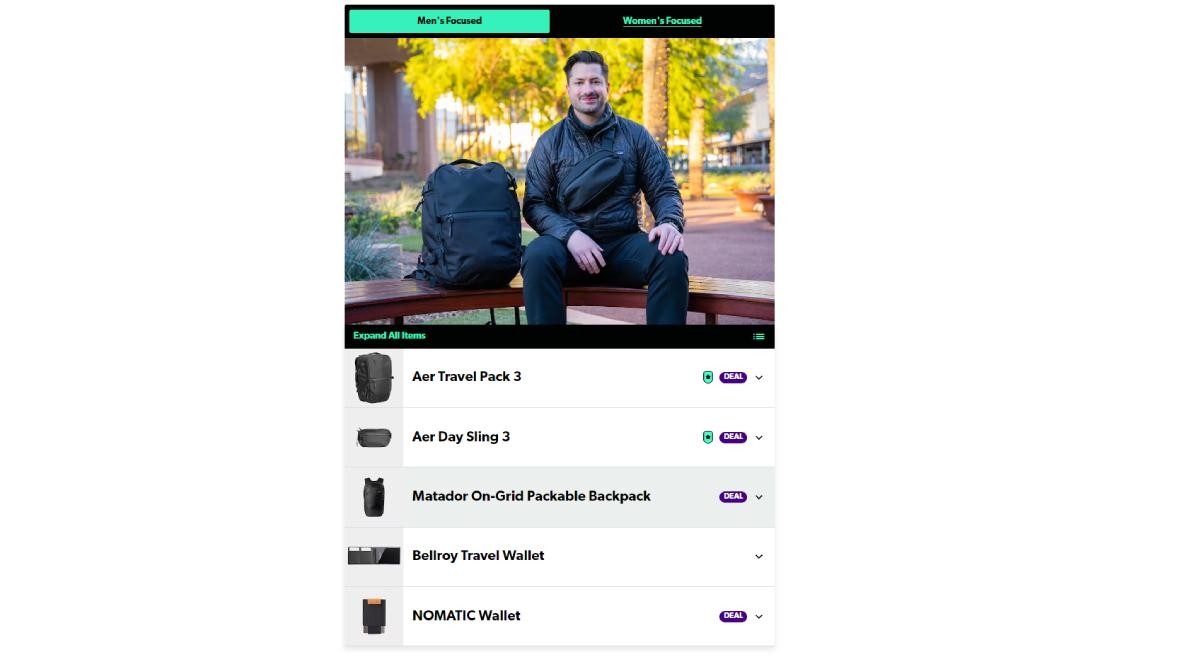
1 The Modest Man

The Modest Man is a fashion site dedicated to men on the shorter side. It’s one of my all-time favorite niche sites — and not just because I’m a “modest” 5’9 — but because this is beyond a “niche site”, this is a great example of a modern niche brand.
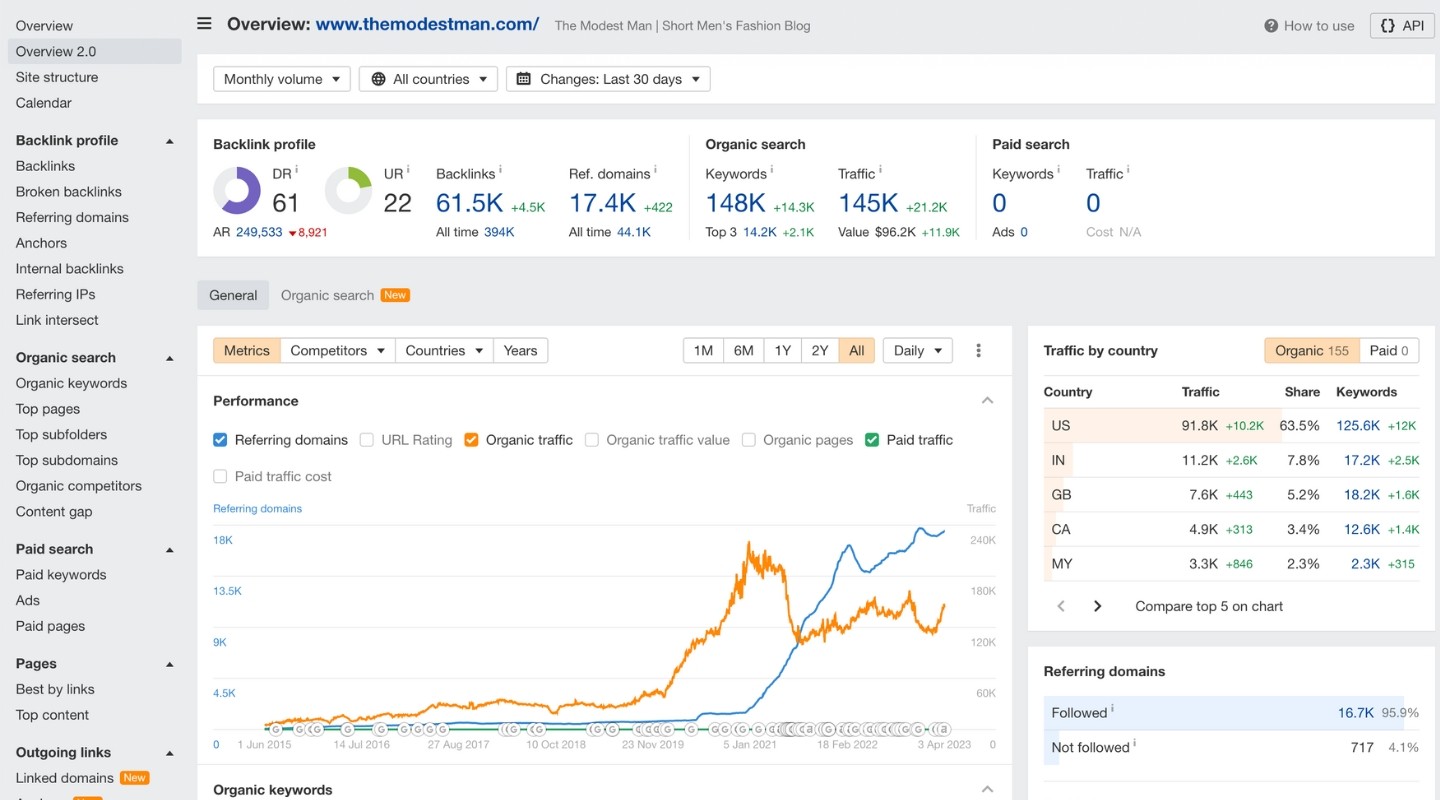
Ahrefs estimates the site attracts around 145,000 organic visitors per month (which I’d say is a hefty underestimation). But Similarweb paints a grander picture with 853,200 visitors in March 2023. About 72% of of those came from search traffic.
The truth is probably somewhere in the middle. The site gets around 20% direct traffic (a good sign that this is a brand people actually like). The rest was made up from social channels, including a YouTube channel with over 400,000 subscribers.
- Total Monthly Traffic (Estimated): 450,000
- Organic Monthly Traffic (Estimated): 250,000
- Domain Rating: 61
How The Modest Man Uses Amazon Affiliates
Fashion advice websites and affiliate marketing go hand-in-hand. While Amazon might not be your first choice for clothing, it’s perfect for accessories like watches.
Watches are a great e-commerce product — they’re high value, small (easy to ship), usually come in single sizes, the styles are pretty timeless (pun absolutely intended) and there’s a vast selection on Amazon. The Modest Man, unsurprisingly, has an article called “31 Great Watches for Small Wrists”, with Amazon affiliates playing a central role in this post.
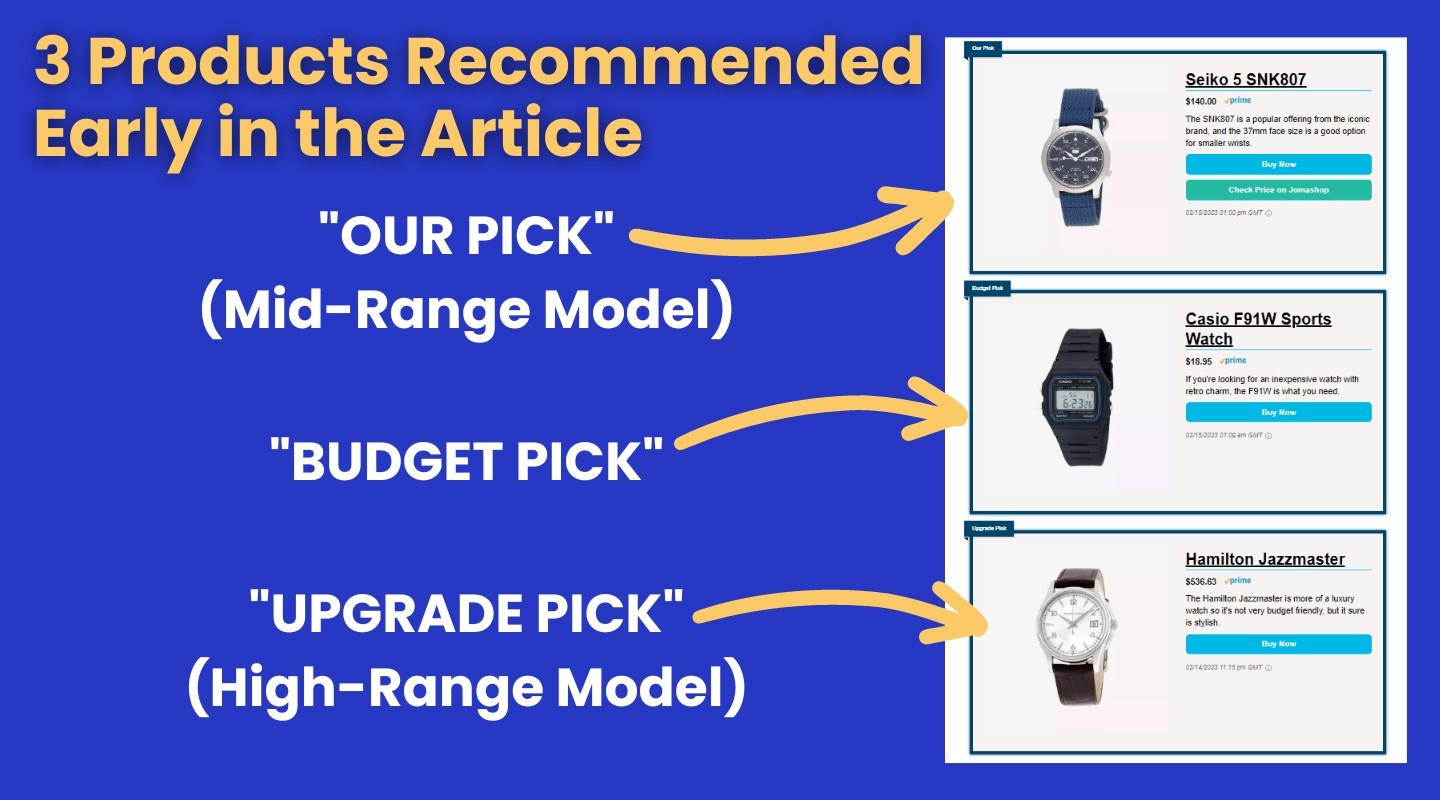
The post uses lots of custom graphics (e.g. which type of watch for which occasion), as well as providing lots of helpful information in a 1700-word article. But The Modest Man has made sure the recommended products are presented in eye-catching Lasso product boxes near the top of the article, as you can see below:
I also spoke to The Modest Man founder, Brock McGoff, about why he uses Amazon affiliates and his tips for getting the best results from the program. Here’s what he said:
Amazon sells everything, so the conversion rate is really high. That, plus the share of other cart items makes up for the short cookie life. It’s still one of my favorite affiliate programs to this day.
But don’t just link to Amazon. Ideally you’re giving readers two or three places to buy every product you mention. Amazon makes sense as a top recommended merchant for some things, but not everything.
As a publisher, you should know your ‘affiliate hierarchy’. For me, it’s individual relationship (i.e. a direct partnership with a brand), then Amazon, then aggregators (e.g. Skimlinks). Look at your numbers, figure out which program is best and prioritize it. These days, you can buy the same products from many different shops, so link to all of them, in order of importance.
3 Ideas to Steal Borrow from The Modest Man
Build a brand, not an “affiliate site”: people can tell when they’re being sold to, so prove to people you care about your industry and you know what you’re talking about.
Don’t just link to Amazon: whenever possible, offer your audience multiple places where they can buy a product (ideally with the live price from each site). Google also recommends this, so it may even help your SEO.
Make your recommendations clear: often, people just want to jump straight to the products that you say are best, so make it easy for them. Product boxes with concise descriptions (and who the product is suited for) near the top of posts improves user experience and increase conversions.
2 Outdoor Gear Lab
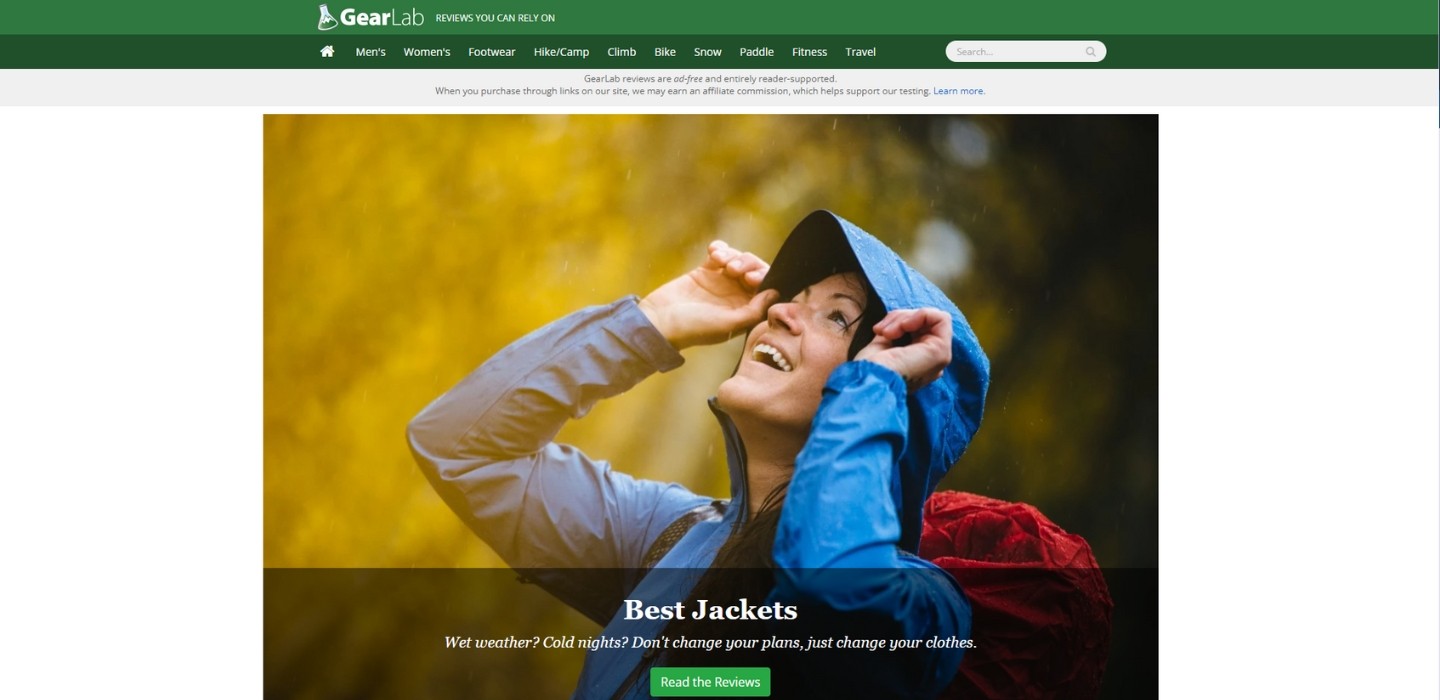
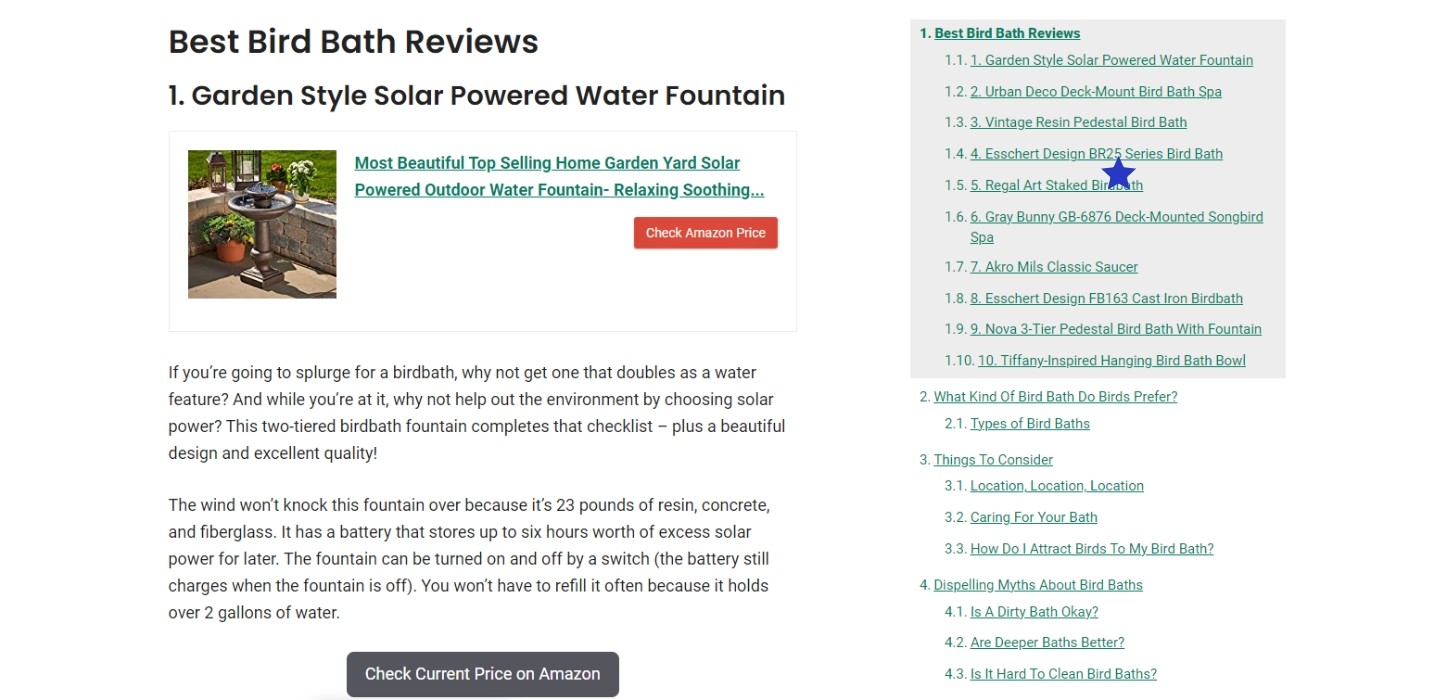
Gone are the days when you could whip up product round-ups and reviews without ever laying eyes on the actual product. Stock photos and generic text just won’t cut it anymore. Want to rank on Google for high-converting buying terms? You’ll need to step up your game.
Take a cue from Outdoor Gear Lab (aka GearLab). They’ve nailed the art of product round-ups by showcasing hands-on experience, rigorous testing, and data-driven results.
And the results are there for all to see…
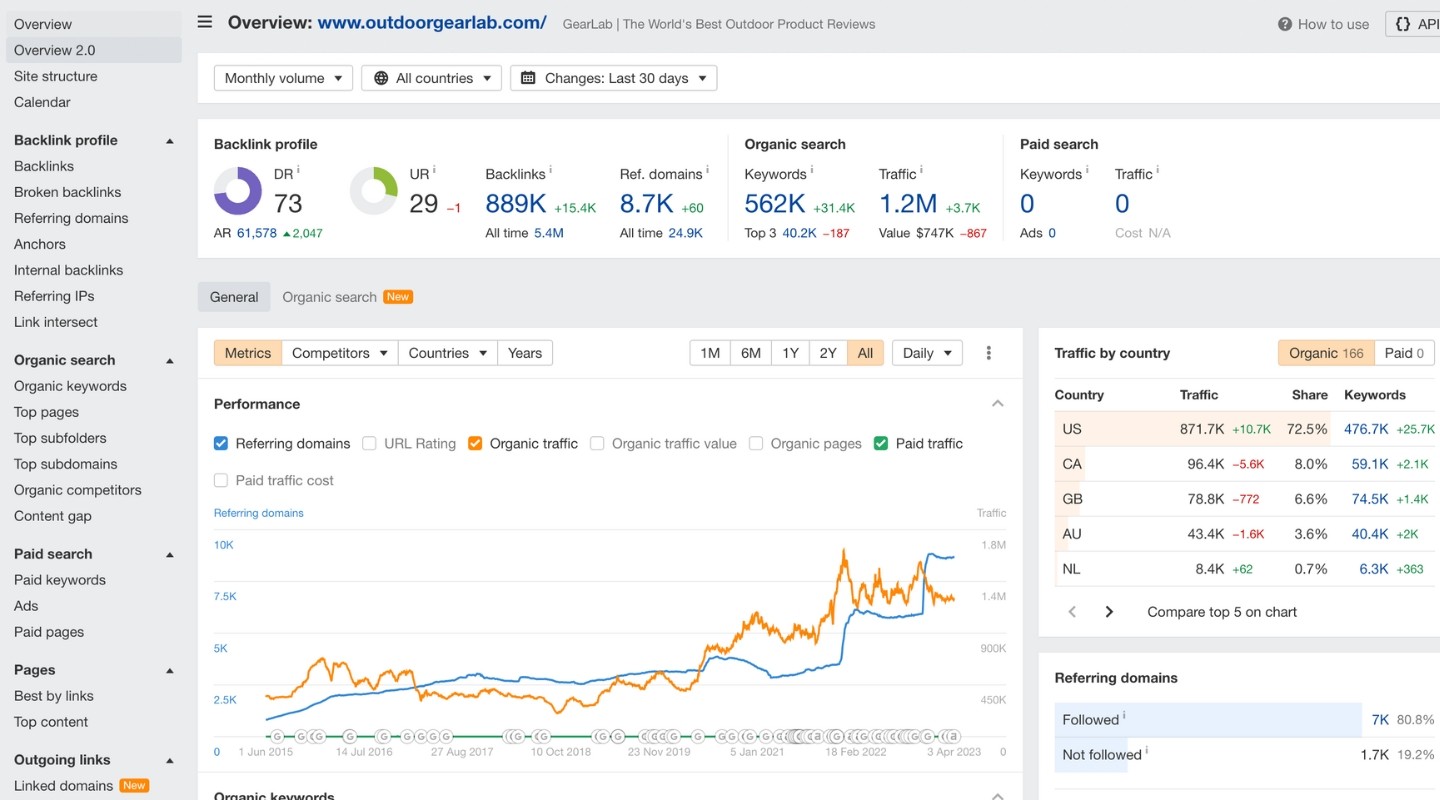
- Total Monthly Traffic (Estimated): 2,500,000
- Organic Monthly Traffic (Estimated): 2,000,000
- Domain Rating: 73
How Outdoor Gear Lab Uses Amazon Affiliates
“Outdoor gear” may sound relatively niche, but it’s a gigantic market with endless product round-up opportunities. It’s not just climbing and hiking, this website also covers cycling, skiing, water sports, fitness wear… you name it.
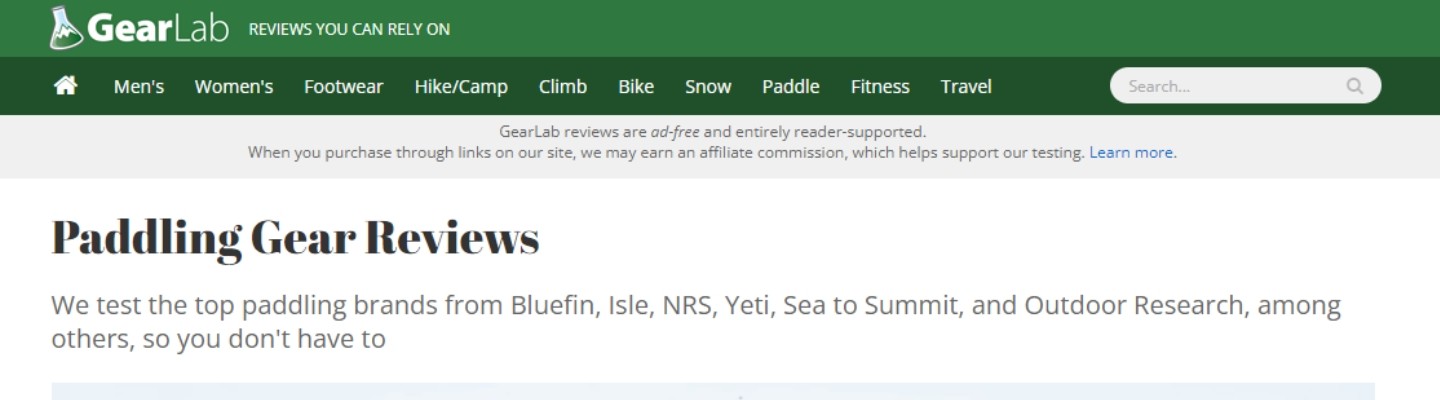
At the top of every page, GearLab has this note: “GearLab reviews are ad-free and entirely reader-supported.” This adds a huge trust factor for users and makes GearLab feel like a brand for the people.
But if readers keep going, they’ll see: “When you purchase through links on our site, we may earn an affiliate commission, which helps support our testing.” Basically, they’ve managed to turn their compulsory affiliate disclaimer into a branding opportunity — and they’ve done it brilliantly, with a simple bit of smart copywriting.
We mentioned Outdoor Gear Lab has a huge niche at its disposal and having launched in 2010, it seems to be making the most of this, with over 7,000 articles on the site — almost all of which are product reviews or product round-ups. So make of that what you will, content ratio conspiracists.
This is an out-and-out affiliate site, but it leans into this fact with a clear brand — everything from the name (GearLab), tag line (“reviews you can rely on”) and each post screams that they are experts in testing outdoor wear.
But GearLab doesn’t bury the products in their articles, they still make it easy for the visitor.
Their product round-ups are very long, often coming in at around 5,000-10,000 words (this guide on “Best Ski Gloves” is a great example). But GearLab doesn’t bury their product recommendations, they still make it easy for the visitor.
Such articles are essentially broken up into two parts:
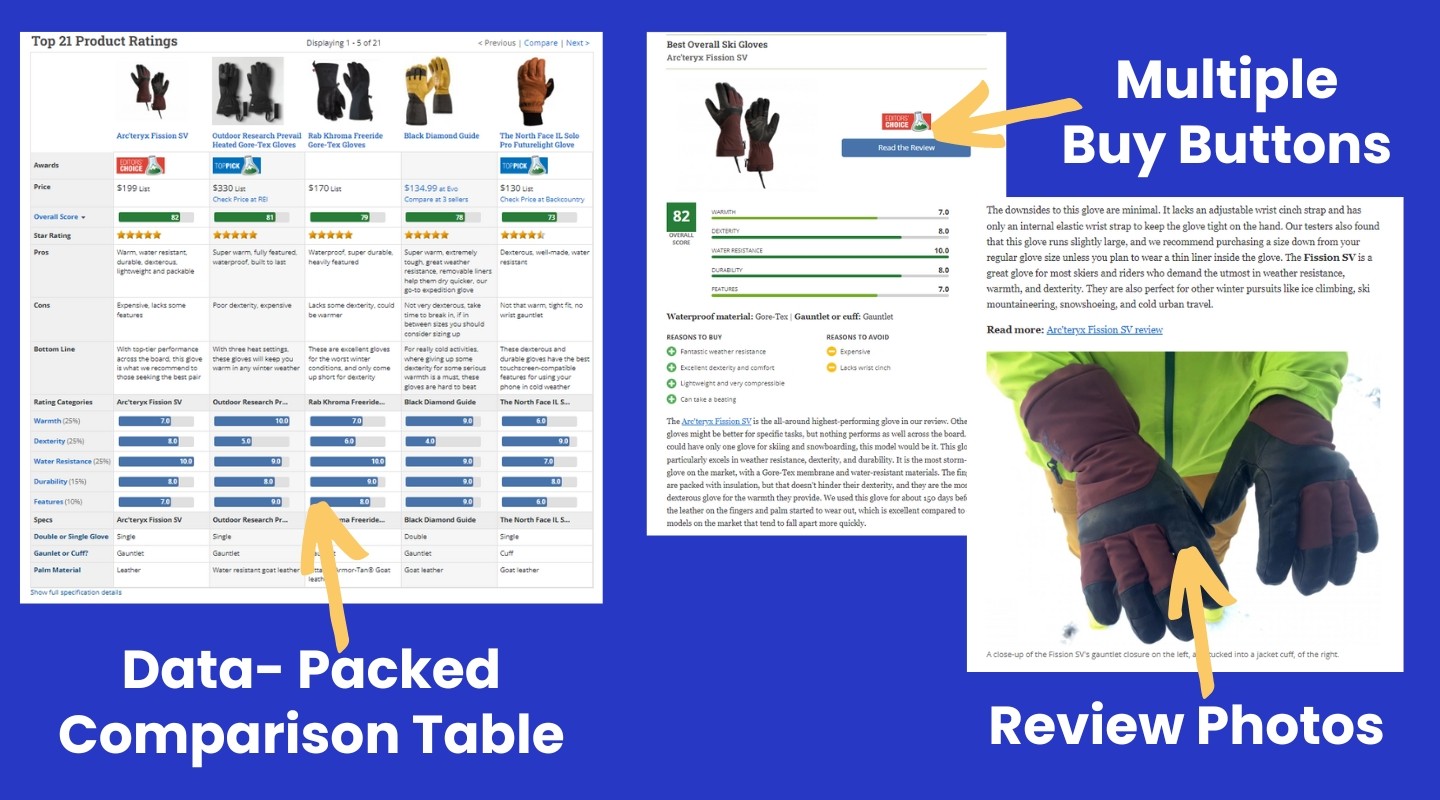
Part One — The key information for visitors:
- Display box highlighting top products
- Short introduction
- Product list with images, links, and scores
- Pros and cons to demonstrate impartiality
- 100-word real-world experience description
- Link to a full review and author image
This section accounts for around 25% of the total word count and may require frequent updates as products change.
The second part is more static. It can be written once and then essentially left as is indefinitely.
Part Two —Testing and additional information:
- Dynamic product comparison table
- “Why You Should Trust Us” section
- In-depth test analysis with tables and graphics
- “How to Choose [PRODUCT]”
- Feature breakdown
While word count isn’t everything, it helps to have comprehensive information formatted for an optimal user experience.
GearLab’s approach creates an outstanding user experience, demonstrating their dedication to research and industry knowledge — it’s an approach all affiliate sites should take.
3 Ideas to Steal Borrow from Outdoor Gear Lab
Deep dive: make the effort to test products in a way that other websites simply won’t. Product review efforts can be repurposed into multiple product round-ups. Tables and graphs are easy to make, but can look very impressive to a visitor.
Branding: use every opportunity you can to cement trust in your brand (even affiliate disclaimers can be used to your advantage).
Don’t limit yourself: pick a niche that has a lot of room for growth.
3 Versus
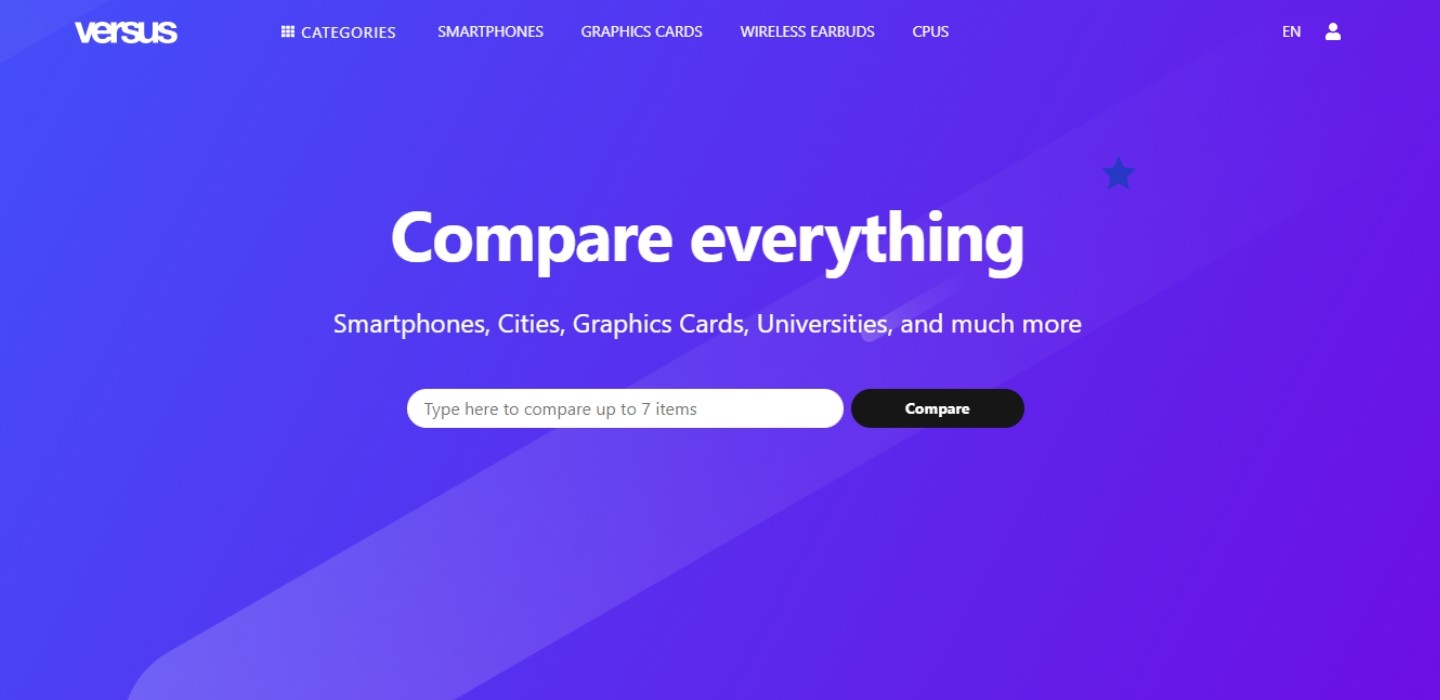
I’ve been banging on about brands creating real hands-on reviews and brands with a personal touch. Versus isn’t that. Not even in the slightest.
But this site is getting close to 10 million visitors per month.
And that’s by barely writing an article…
- Total Monthly Traffic (Estimated): 8,000,000
- Organic Monthly Traffic (Estimated): 5,000,000
- Domain Rating: 70

How Versus Uses Amazon Affiliates
Versus is an epic example of programmatic content.
As the name suggests, Versus helps people — in its own words — “Compare everything”. Whether that be tech, apps, travel, household items or even seeds (yes, seeds), Versus enables you to pit similar products head-to-head.
By creating a database of products with data, Versus scores products on a variety of factors, enabling it to easily compare products quantitatively.
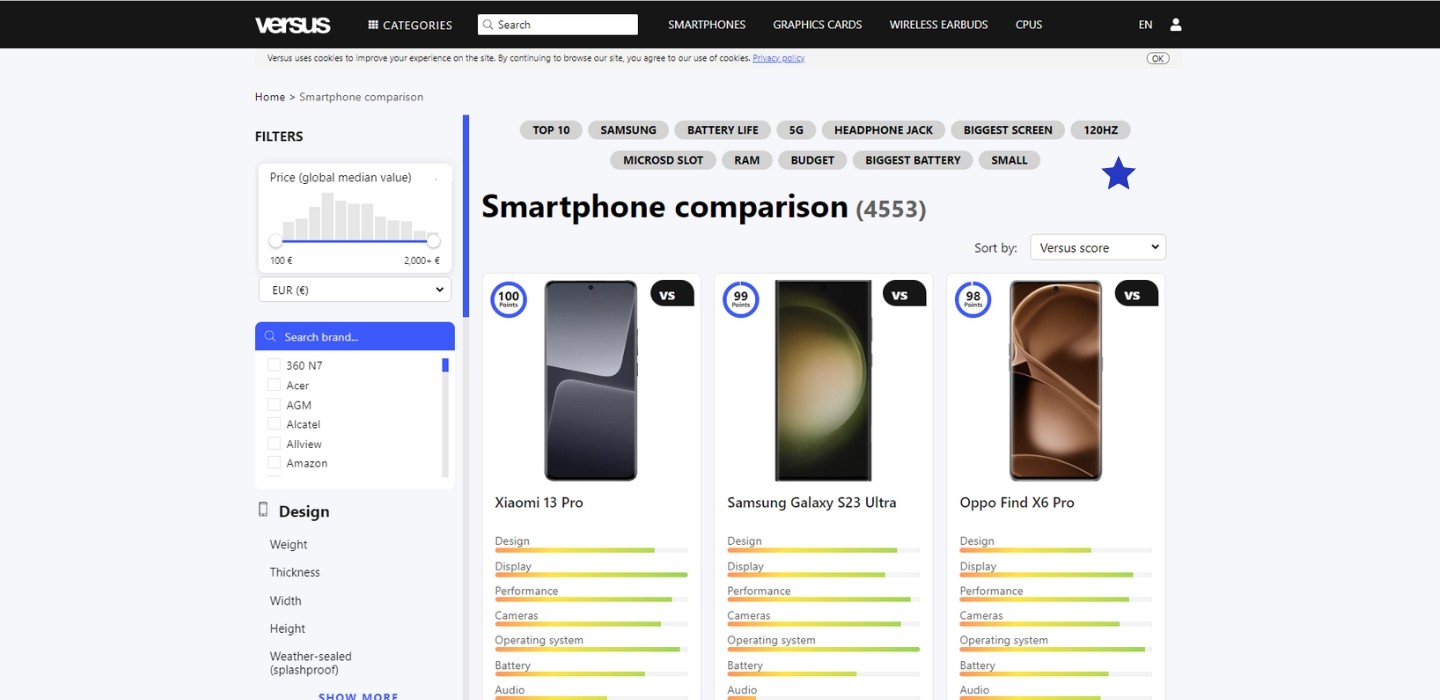
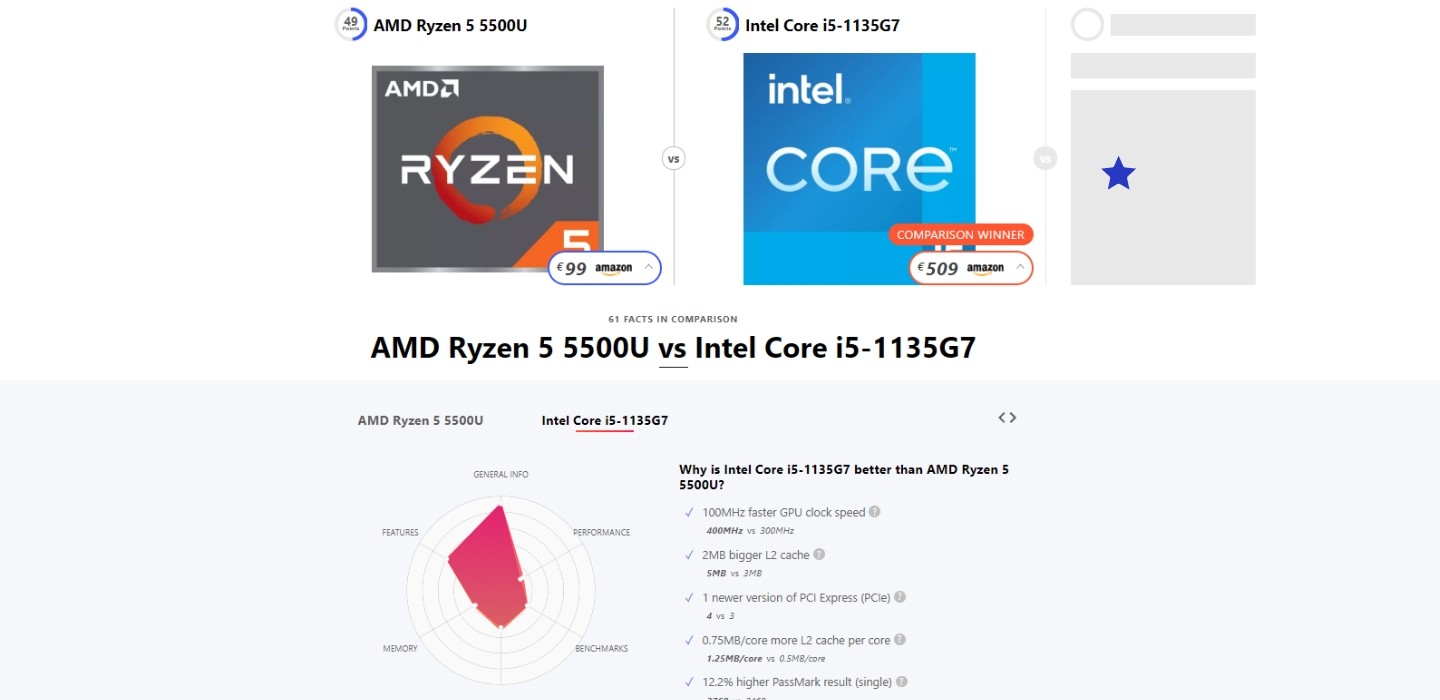
It then collates products into product round-up-esque pages (although it’s all data comparison, rather than opinion (such as “Best Smartphones”) and head-to-head posts comparing one product directly against another (e.g. AMD Ryzen 5 5500U vs Intel Core i5-1135G7).
The real magic lies in the scale of content Versus produces. With over 150,000 indexed pages, that’s equivalent to writing a post every day for 410 years!
Let’s break it down: while some websites create a single round-up post featuring 20 products, Versus takes it to the next level. They create 20 individual product pages and an additional 190 pages just by comparing each product against the others. That’s 211 pages versus 1 – no wonder they’re generating so much traffic!
And at the heart of these product-focused articles? Amazon links. Versus offers price comparisons for every product, but they always highlight the Amazon link in bright red at the top – even if it’s not the best price. It seems Amazon is their go-to affiliate store.
3 Ideas to Steal Borrow from Versus
Use tech to your advantage: programmatic content can produce epic results if well thought and done correctly.
People like data: in a world of empty opinions, Versus cuts through the noise by providing users just the data behind every product.
Amazon wins: with a website like this, you can bet Versus have run endless data experiments to determine which affiliate program to use. The fact that Amazon is recommended on every page speaks volumes.
4 Pack Hacker
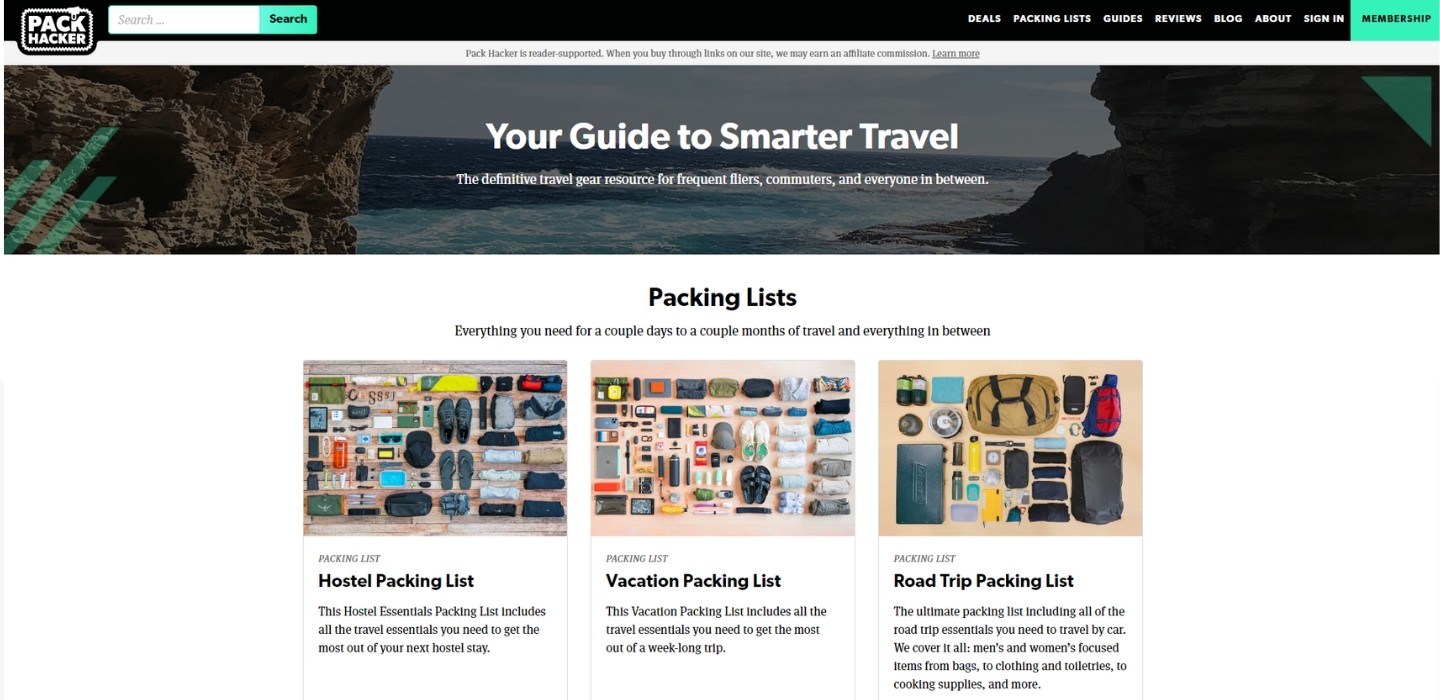
Pack Hacker is a website that triggers me.
I feel like I have unfulfilled OCD (in that I long to be organized and tidy, but I’m just not) so looking at this website has me purring with admiration at the organization that it has achieved (especially the pictures).
But triggers aside, this is an awesome example of an Amazon affiliate site for several reasons, and a lot can be learned from it.
- Total Monthly Traffic (Estimated): 600,000
- Organic Monthly Traffic (Estimated): 300,000
- Domain Rating: 53
How Pack Hacker Uses Amazon Affiliates
Some people can feel a bit dirty at the thought of “salesy” affiliate marketing. But Pack Hacker has its visitors gagging to click on its affiliate links.
It achieves this by triggering (yes, that word again) a hunt-and-discover emotion in visitors.
Every post has a featured image in which the contents of a bag are laid out in that minimalist Instagrammable flat lay style.
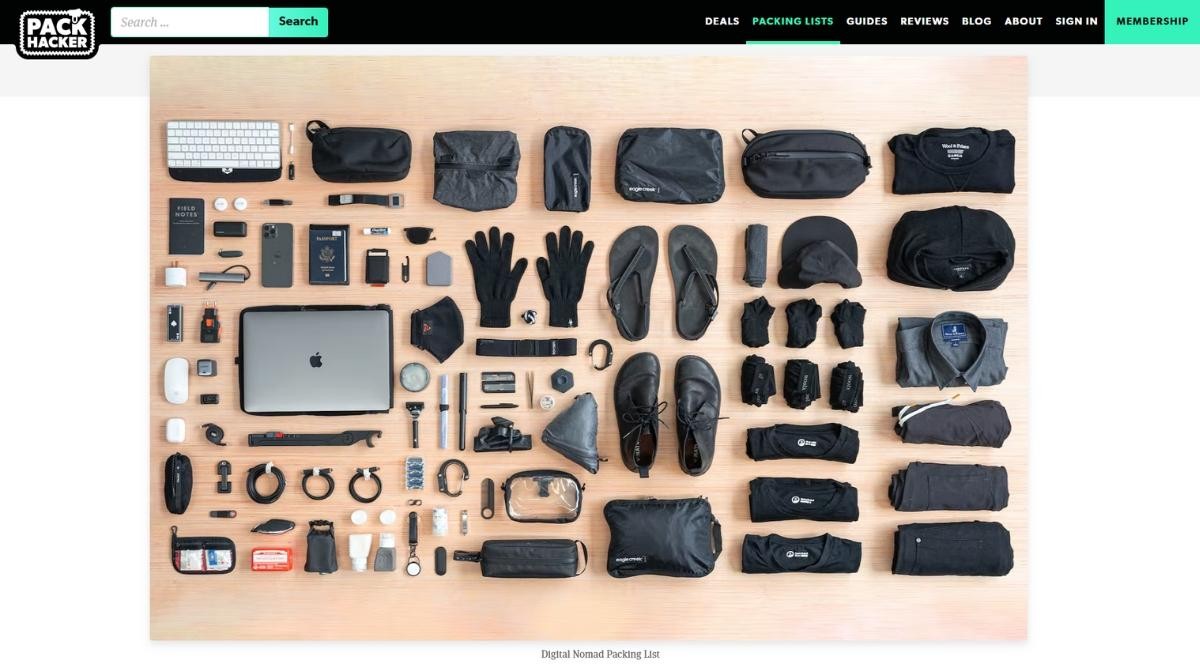
As you scan the image, you’ll likely spot a few items that grab your attention. Naturally, you’ll want to hunt down those items on the page and find out what they are. And when you do, it’s almost guaranteed you’ll click on the affiliate link to explore the product further.
Chances are, you’ll make an impulse purchase through that Amazon affiliate link. This is the perfect type of audience for an Amazon affiliate business, as these shoppers are likely to add even more products to their cart, earning you extra bonus commissions.
3 Ideas to Steal Borrow from Pack Hacker
Create intrigue: let people hunt down links on your page by presenting an intriguing image at the start of your post
Additional recommendations: a product round-up doesn’t simply have to follow the “best X for Y” format, you can create round-ups based around an activity or experience, so people aren’t comparing one product against another, but instead look for additional products that can provide value.
Clean UI: be intentional with your page design, especially when you’re presenting affiliate links — make the products easy to find and ensure the links pop!
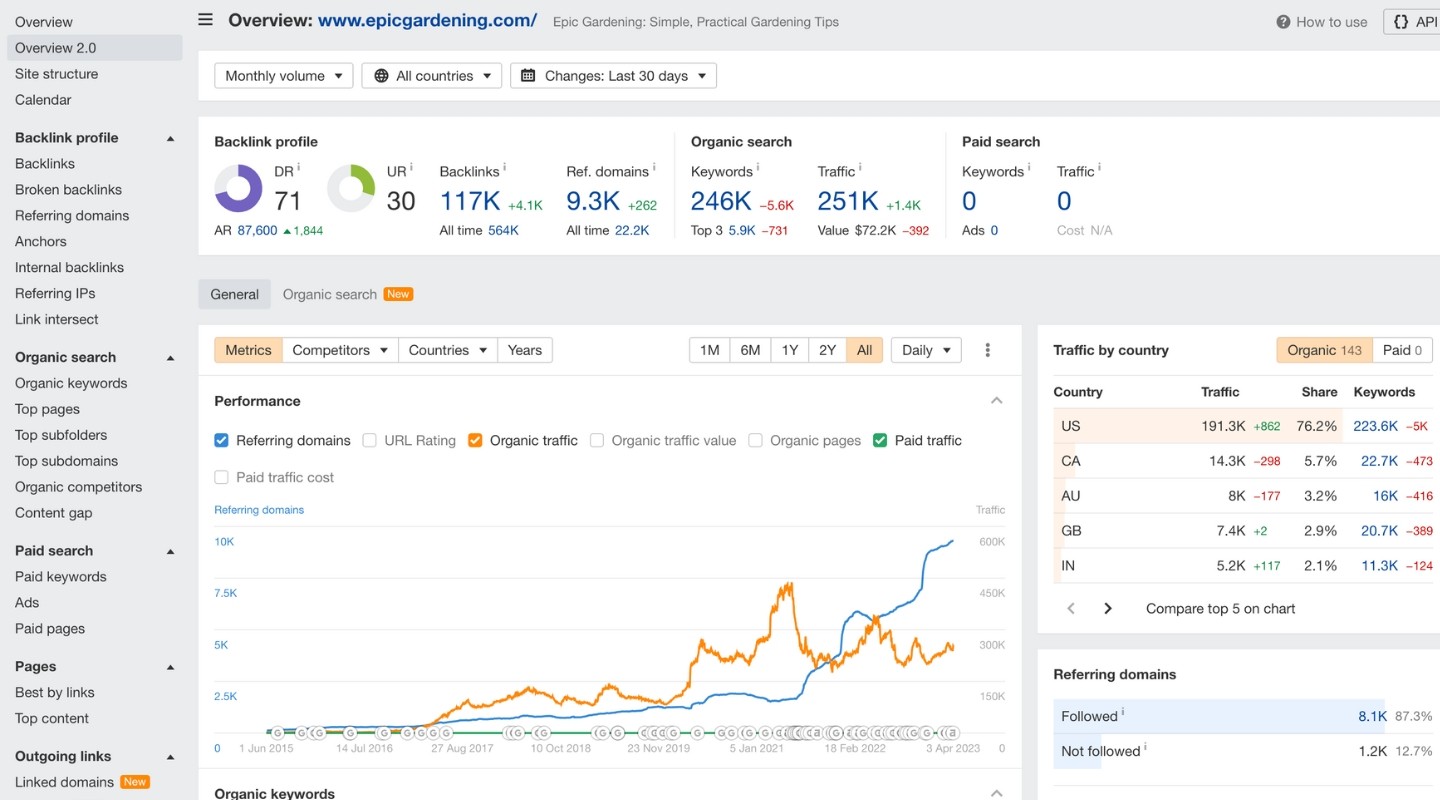
5 Epic Gardening

You might have caught the Authority Hacker podcast where we talked about a gardening niche site that now rakes in eight figures a year.
The site’s founder, Kevin Espiritu, has skillfully leveraged social media and YouTube to grow the brand, while the website serves as a hub for affiliate content.
Thanks to Kevin’s epic branding efforts, he’s built a solid reputation and authority in the gardening world, which has opened doors in the affiliate realm.
- Total Monthly Traffic (Estimated): 600,000
- Organic Monthly Traffic (Estimated): 400,000
- Domain Rating: 71
How Epic Gardening Uses Amazon Affiliates
While the Epic Gardening brand is pretty incredible, the site’s affiliate content is pretty standard.
Sure, the content has been laid out well and there’s nice product boxes (using AAWP) and tables — but it’s not the most unique affiliate content you’ll ever see.
If this was your everyday faceless affiliate content site, it might not do too well. But thanks to the incredible brand that’s been built, this site can easily rank for such content.
Diversification is also a key to the success of Epic Gardening. The site gets traffic from multiple sources (social media, YouTube, email), it provides a wide variety of content (how-to guides, informational content, affiliate content) and it’s also monetized in many ways (affiliates and its own e-commerce store)
3 Ideas to Steal Borrow from Epic Gardening
Front-load recommendations: use a table or summary box to present the best products and their key features.
Diversify: don’t just rely on a single monetization method. Affiliate marketing is great, but there are also ads you can embed and products/courses you can sell.
Make use of Amazon-related tools: Epic Gardening uses AAWP boxes to help make product recommendations really stand out. This is a quick and affordable way to increase your click-through rate (and hopefully commissions).
6 Swim University
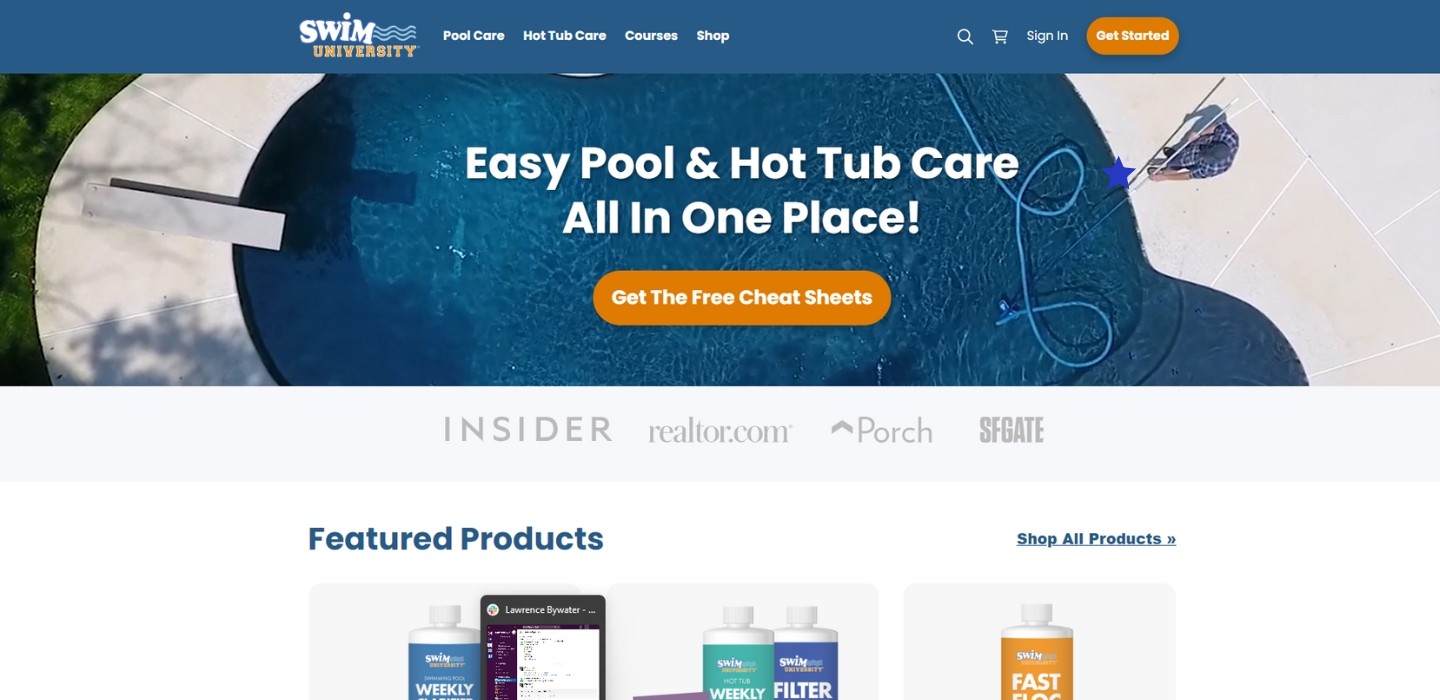
If you ever hear Swim University founder, Matt Giovanisci, talk about his business, you’ll know that affiliate marketing is far, far from the priority of his online business.
The focus of Swim University is selling digital maintenance courses and real pool products to pool owners — and it’s a great business. But that hasn’t stopped this website from, shall we say “dabbling”, with some Amazon affiliates.
- Total Monthly Traffic (Estimated): 160,000
- Organic Monthly Traffic (Estimated): 100,000
- Domain Rating: 67
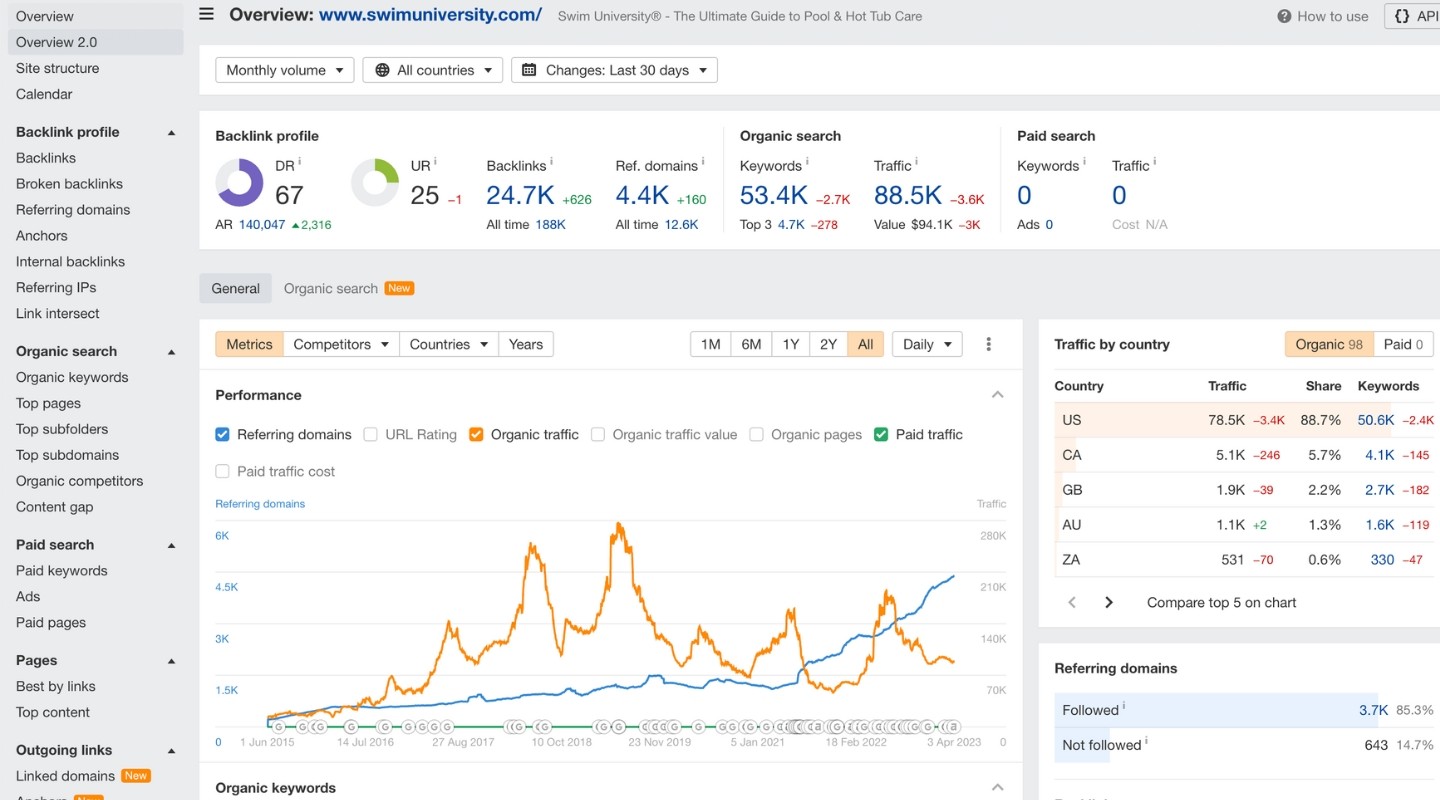
How Swim University Uses Amazon Affiliates
Affiliate marketing may rank third in Swim University’s monetization methods, but it’s still a valuable asset to the business.
The site’s priorities are clear. Even product round-up pages (e.g. Best Chlorine Tablets) feature a primeabove-the-fold section dedicated to email list sign ups. The affiliate content on the site is actually very simple — but effective. There is little unique imagery but — a bit like Epic Gardening — an individual page can get away with this based on the overall strength of the brand.
The website design is very easy on the eye, though, and Lasso product boxes ensure that the product recommendations really pop.

Interestingly, only Amazon products are featured, likely because Amazon’s affiliate program is the most straightforward way to promote products with minimal hassle.
3 Ideas to Steal Borrow from Swim University
Building a brand gives you leeway: by having a strong and trusted brand behind you, you can enjoy producing simpler content that still converts
Don’t put your eggs in one basket: diversify your online business in any way you can, and if you can control your product offering – even better.
Amazon just works: if you’re looking for a simple solution for an additional monetization method for your website, Amazon affiliates is about as good as it gets.
7 Retro Dodo
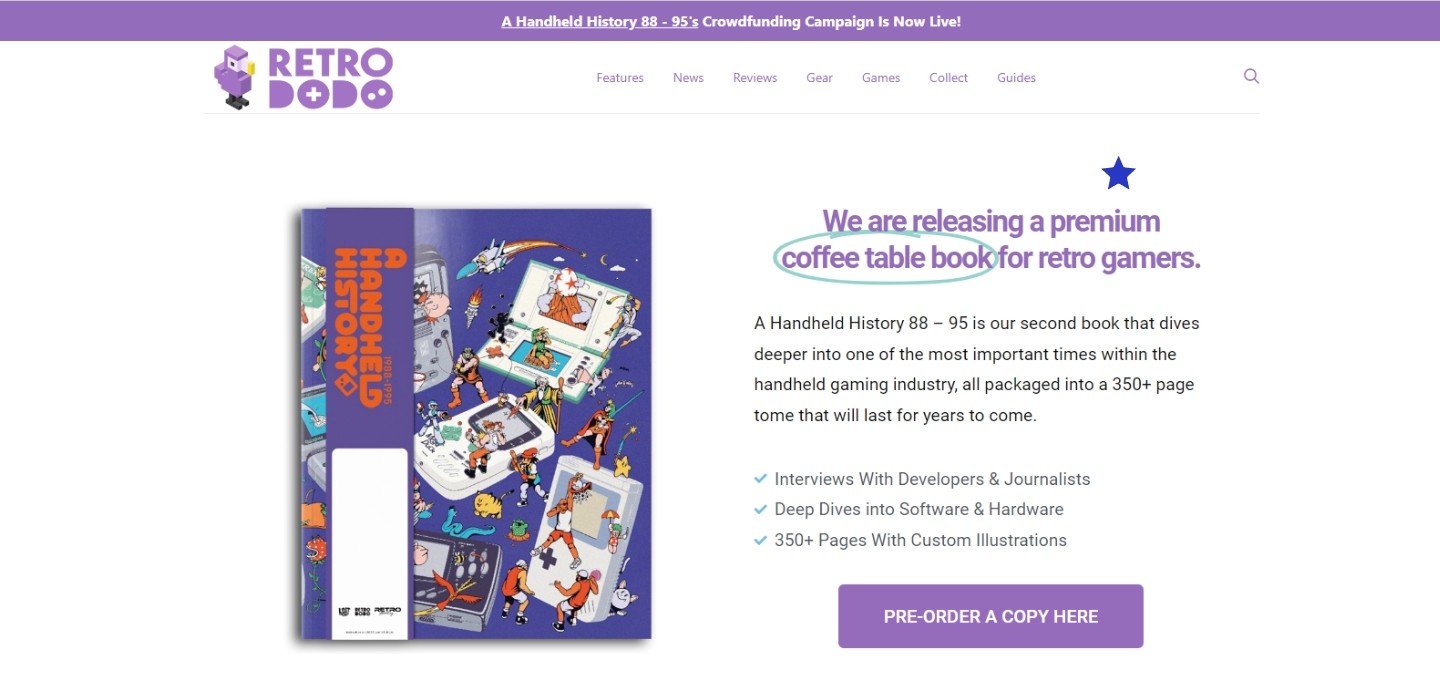
This is a wonderful example of the potential of a “one-man” niche website. There’s no big corporation here, Retro Dodo was created by Brandon Saltalamacchia in 2019 with the aim of “entertaining and educating retro games about the latest and greatest products within the niche”.
The site has done brilliantly since, with Brandon revealing Retro Dodo now gets over a million monthly visits and makes around $50,000 each month from the website. Plus it has a thriving YouTube channel (270k subscribers).
- Total Monthly Traffic (Estimated): 1,000,000
- Organic Monthly Traffic (Estimated): 800,000
- Domain Rating: 46
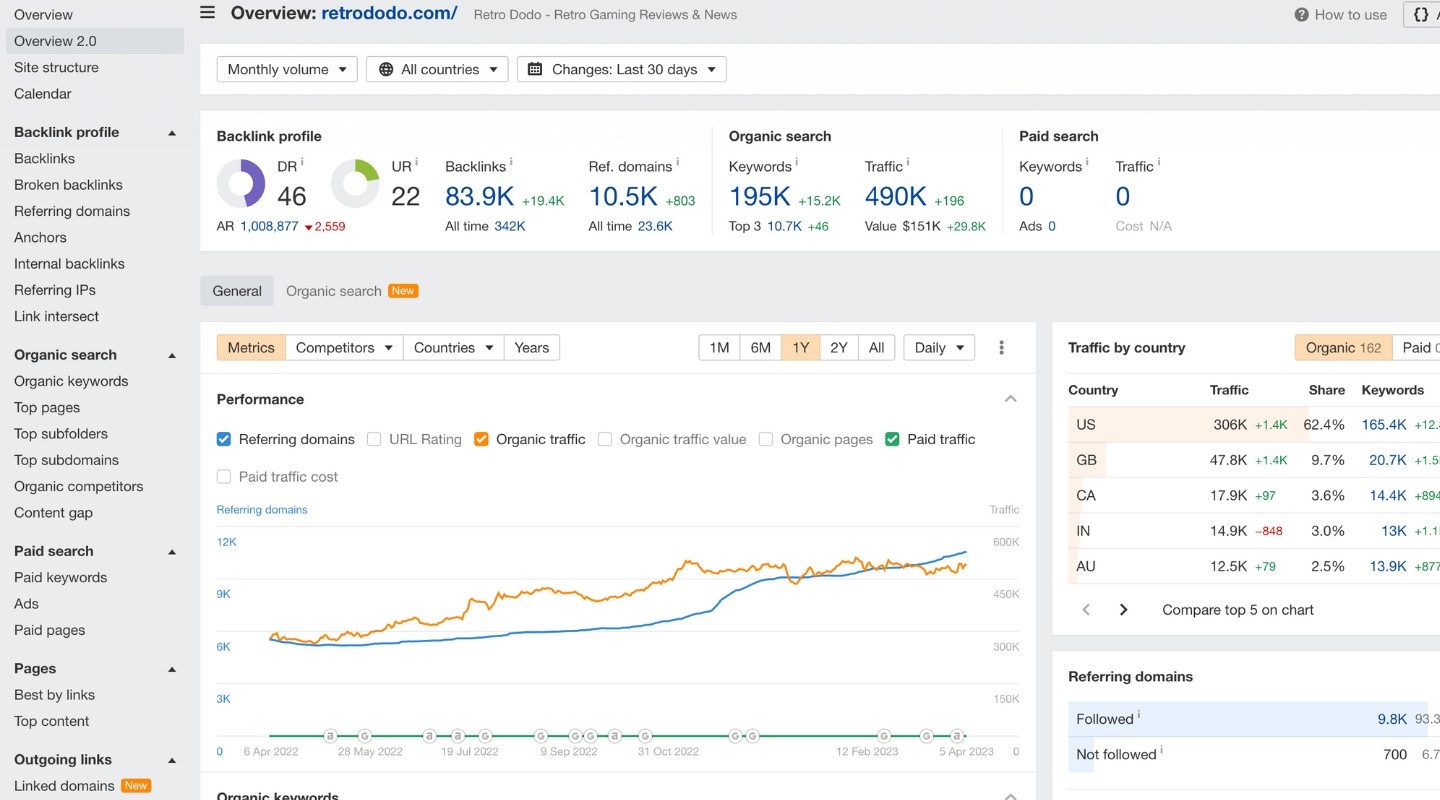
How Retro Dodo Uses Amazon Affiliates
Retro Dodo has many different income streams, including affiliates, programmatic ads (from Mediavine), YouTube ads, plus its own range of products (primarily real books). Interestingly, only 20% of their $50,000 monthly revenue comes from affiliate commissions — a relatively low percentage for an authority site like this.
That’s largely because much of Retro Dodo’s traffic goes to news, tips and how-to guides. But they have also covered their affiliate bases, so you’ll also see things like “Best 80s Toys Every 80s Kid Remembers”.
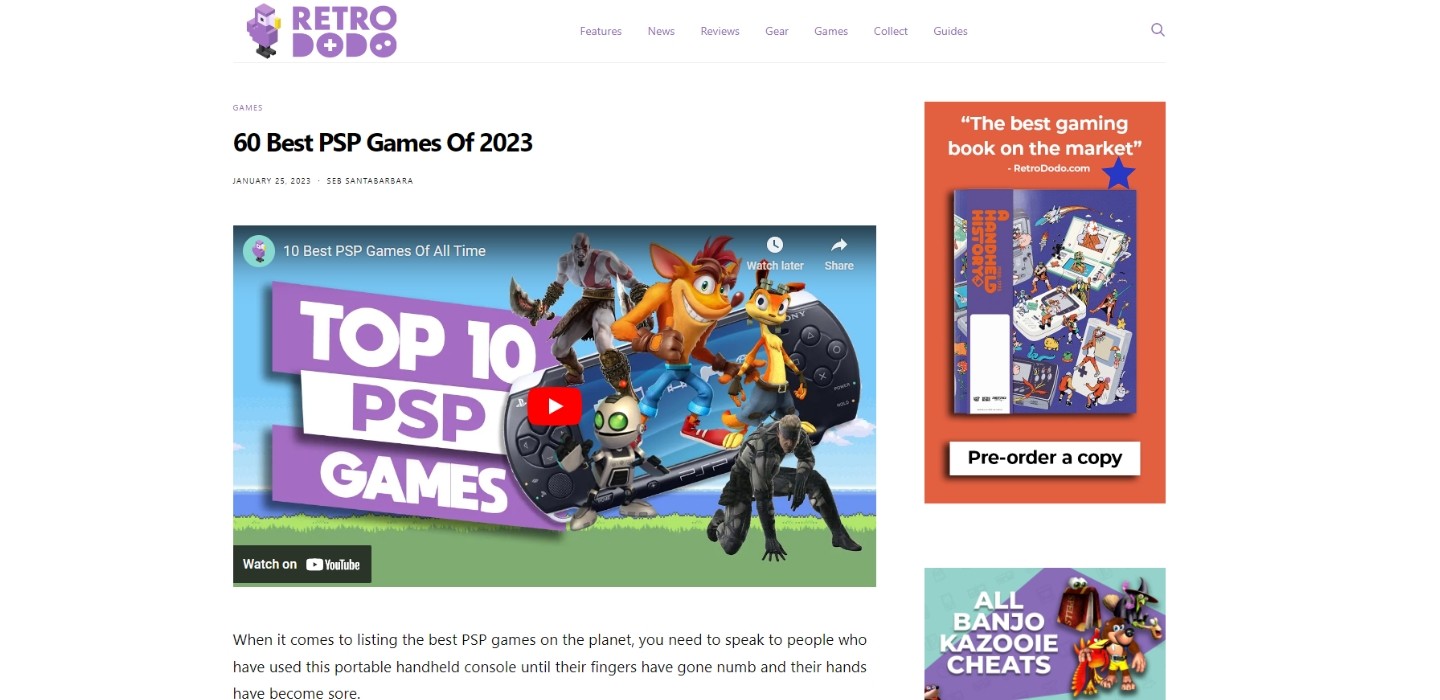
The product round-up pages themselves aren’t particularly spectacular. There’s no fancy product boxes or tables and the images look like they’ve been lifted from the product’s website and then applied to a generic Retro Dodo background.
But Retro Dodo does two things really well in their product round-ups:
- They kick off most round-ups with an informative, in-depth video from their YouTube channel, showcasing their expertise.
- They cover a TON of products. Their “Best PSP Games” post, for example, mentions 60 games and boasts a whopping 12,519 words!
I spoke to Brandon Saltalamacchia, founder of Retro Dodo, and he had some valuable insights as to why the Amazon affiliate program is so valuable:
I use Amazon Affiliates because it’s where most of my community go to buy products within my niche. It’s a trusted source with fast shipping which increases the chance of my audience buying the product.
Amazon compares poorly compared to other affiliates we use if you look at the earnings per sale, but actually over time, I find that my audience trusts Amazon more, and are even happy to pay a premium on Amazon compared to other cheaper marketplaces because of the brand trust. There’s also the chance that the user adds more to their basket than just the product we recommended increasing the commission even more.
My tip would be to use third party plugins or tools that show the Amazon product’s details on your website, a button just doesn’t cut it any more and it’s something I am looking into on my projects to increase click throughs.
Overall, Amazon affiliates brings in around 5-10% of Retro Dodo’s total income, making up about 40% of our affiliate income.
It may have terrible commissions compared to other affiliate programs, but it’s the easiest solution for your readers, and that’s what you should prioritize – not which marketplace seemingly earns you more. Put the reader first and the revenue will follow.
3 Ideas to Steal Borrow from Retro Dodo
Demonstrate expertise: show that you really know and care about what you’re talking about. Retro Dodo excels at this by creating epic YouTube videos and even producing beautiful books on the topic.
Simple can work: Retro Dodo’s product round-ups aren’t particularly fancy, but they give the user what they’re looking for and make it easy and don’t add any unnecessary fluff.
“Put the reader first and the revenue will follow.”
7 Things We Can Learn From These Amazon Affiliate Sites
- Feature top recommendations: Showcase your top product picks as high as possible on your pages, most “readers” don’t read your content and click directly on these links.
- Diversify retailer links: Don’t limit yourself to Amazon; provide links to various retailers for a well-rounded shopping experience.
- Establish a solid brand: Boost trustworthiness by building a strong and recognizable brand that resonates with your audience.
- Leverage tools that improve your CRO: Utilize tools like Lasso and AAWP they have field-tested designs that will improve your conversion rates and bottom line..
- Optimize for international visitors: Employ Amazon Link or Geniuslink to automatically redirect global users to their local Amazon stores, enhancing their shopping experience.
- Scale with programmatic content: Scale your content output with smart, programmatic solutions to rank for ultra-niche low-competition keywords.
- Diversify income streams: Don’t just rely on Amazon! Expand your revenue channels by exploring other affiliate programs, display advertising, and — even better — creating and selling your own physical or digital products.
I could have easily listed 100 things we could learn from these Amazon affiliate website examples, but these seven points are the most pertinent. That said, there are two broader guiding principles if you want to enjoy sustained success with — not just the Amazon affiliates program — but indeed any authority site you want to create:
- Don’t be generic. Even if you rank for a “best X for Y” keyword, you won’t be there for long with boring product descriptions and stock photos.
- Do go that extra mile. Put the user at the forefront of your mind and think about what will benefit them most. That can mean great photos. That can mean a great user experience. That can mean a personal recommendation. That can mean a new twist on data analysis.
Conclusion: Start Your Own Amazon Affiliate Site
The evidence is clear: these Amazon affiliate website examples have shown it is still possible to make serious money with the Amazon affiliate program — if you do it the right way.
If that’s something you’d like to do, we can help you create or grow your on highly profitable authority site, by:
- Uncovering obscure — but highly profitable — niches
- Learning how to rank quickly
- Start making real money while doing so
To get started, claim your 100% free Authority Hacker training today.